File sharing with NFS – Installation
NFS, the Network File System, is a mature protocol designed to share files between Unix-type systems over TCP/IP networks. Fedora Server Edition installs by default the kernel space NFS server, but without configuration and activation. This article describes its configuration and activation.
The objective of this guide is how to setup NFS Server on a Fedora Server Edition. For information on how to setup the client part, consult your OS’s documentation.
NFS is a Network service in Linux used to share the files and directories of the Server to users (clients) on the network. It allows clients to mount a remote directory or complete filesystem over a network and interact with it much like local storage is accessed. It is the same principle as Map Drive in Windows Systems. One of it most used benefits is to store and access data on central location.
The NFS Protocol was first introduced by Sun Microsystem in 1984. The protocol has evolved from its origins. Over the years, new versions have been released, adding new features. Currently, NFS v4.2 is the current version. Perhaps most practically significant is the optional user identification as well as a virtual ROOT.
NFS protocol is not encrypted by default, and unlike Samba, unless you activate the optional feature it does not provide user authentication. Access to the server is restricted by the clients’ IP addresses or hostnames.
The kernel space NFS server features high performance and is therefore selected as default. Fedora Server also supports user space NFS server. However, this is not the subject of this article.
Preparation
There are three packages which provide basic support for kernel space NFS:
- nfs-utils
-
is the main package and provides a daemon for the kernel NFS server and related tools. It also contains the showmount program to query the mount daemon on a remote host for available ressources, eg listing the clients which are mounted on that host. It also contains the mount.nfs and umount.nfs programs.
- libnfsidmap
-
NFSv4 User and Group ID Mapping Library that handles mapping between names and ids for NFSv4.
- sssd-nfs-idmap
-
SSSD plug-in provides a way for rpc.idmapd to call SSSD to map UIDs/GIDs to names and vice versa. It can be also used for mapping principal (user) name to IDs(UID or GID) or to obtain groups which user are member of.
Ensure that these packages are really installed.
[…]$ rpm -qa | grep nfs
libnfsidmap-2.6.2-2.rc6.fc37
sssd-nfs-idmap-2.8.2-1.fc37
nfs-utils-2.6.2-2.rc6.fc37
If a package missing, then a system administrator can simply reinstall it.
Organizing storage
In principle, NFS can share any directory on the server. However, it makes sense to concentrate at least generally shared files in a central location instead of scattering everything around.
Furthermore, it is a best practice is to use a global NFS root directory and bind mount those directories which are holding specific data at specific locations to the share mount point.
In accordance to the Filesystem Hierarchie Standard (FSH), using a /srv/nfs4 directory as the NFS root is a good choice.
Following Fedora Server storage rationale, a system administrator will create a logical volume and mount it to either /srv to create a Logical Volume as a pool for various services, or /srv/nfs to create a Logical Volume, probably thin provisioned, for each service. In case of systematic extensive utilization, a static LVM volume of fixed size is advisable. For occasional usage, a thin provisioned logical LVM volume might be the better choice.
In this guide we will demontrate the latter and create a thin provisioned LV for each service in /srv.
-
Create a nfs export directory in /srv
[…]$ sudo mkdir /srv/nfsThe created directory is by default readable for everyone, but not writable.
-
Create a user and group nfs
As already stated, nfs does not provide user authentication. A common way is to either use the same UID/GID for a given user on all devices on the network or to map every client to user nobody and make the export files read- and writable for everybody, i.e. for any user of the system. The former is difficult to achieve without a central logon instance, and the latter is at best inconvenient from a security point of view. So we use a pseudo user without a home directory and without a login shell, who owns all exported files and directories by default.
[…]$ sudo adduser -c 'nfs pseudo user' -m /nonexisting -M -r -s /sbin/nologin nfs -
Create and mount the required Logical Volumes
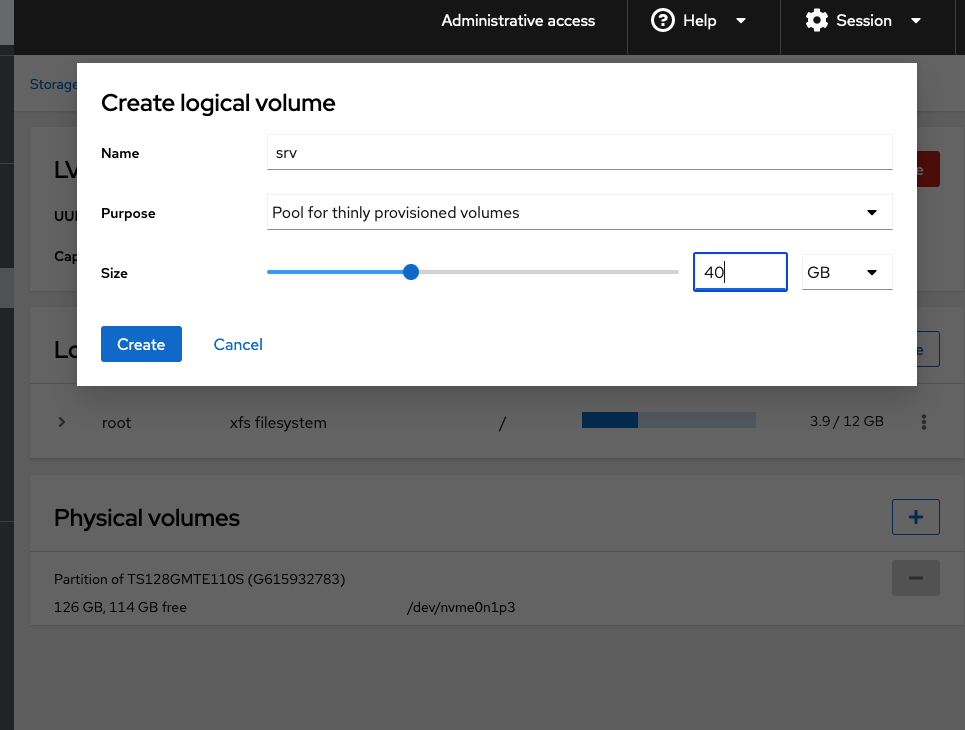
The easiest way is to use Cockpit with its storage module. Select on the right side the root Volume Group and select "Add logical volume" in the new window.

Fill in the form as needed. It is useful to name the LV to reflect the content or directory you want to store. Select "Pool for thinly provisioned volumes" and choose an appropriate size to accommodate all the data you plan to store.
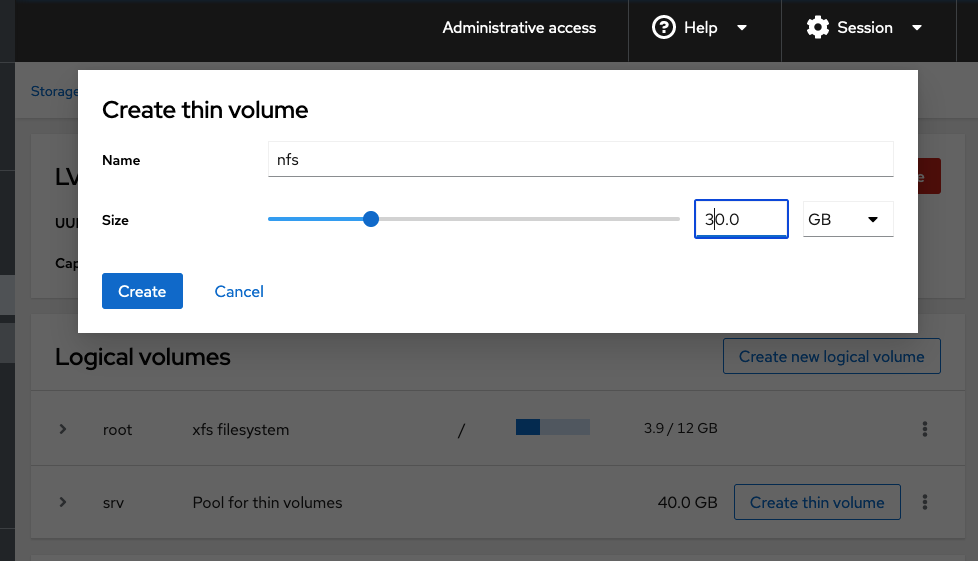
In the list of logical volumes that is then displayed, the line with the newly created LV contains the option "Create thin volume". It opens a new form to create a LV to store data. We will use it for nfs exports.

Fill in the form appropriately. Keep in mind that you are specifying the maximum value for the size of the volume. The system starts with a much smaller initial value and expands it as needed.
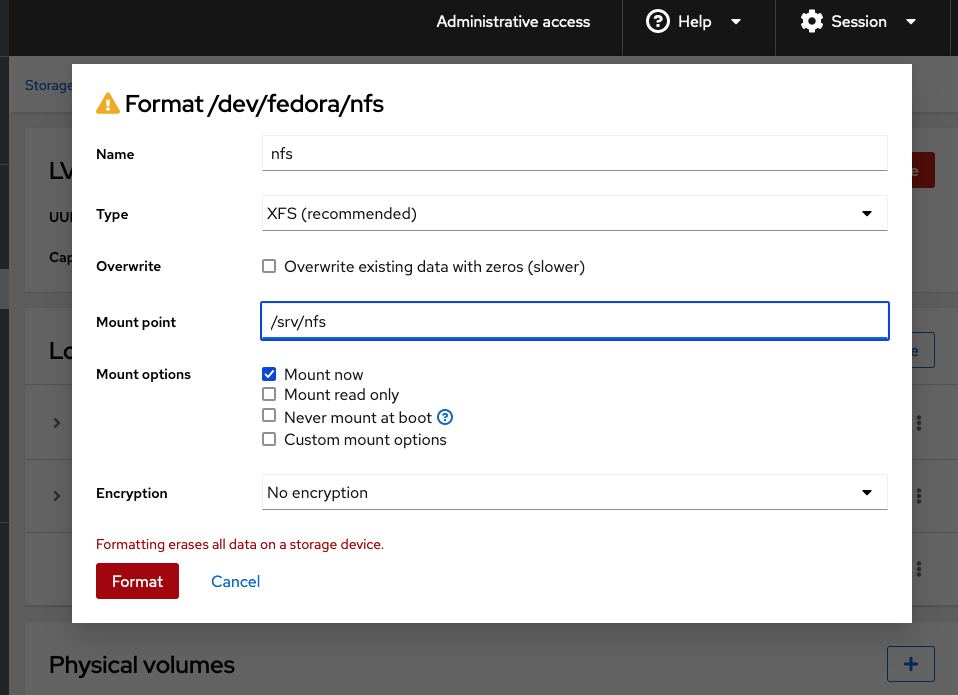
After the creation of the volume the list of logical volumes contains a new entry for the logical Volume just created with an option "Format". It opens a new form.

Again, fill in the form and you are done.
For hardcore system administrators with mouse allergy, the whole thing via CLI.
[…]# lvcreate -L 40G -T fedora/srv -V 30G -T fedora/srv -n nfs
[…]# lvs
[…]# mkfs.xfs /dev/fedora/nfs
[…]# mkdir -p /srv/nfs
[…]# vim /etc/fstab
...
/dev/mapper/fedora-root     /                  xfs   defaults    0 0
/dev/mapper/fedora-nfs      /srv/nfs           xfs   defaults    0 0
...
Finallly mount the created filesystem.
[…]# mount -a -
Create and configure the directories to share
In a typical use case you may create a directory 'common' to widely share data and a directory 'project', in which a team member shares data located in the home directory with the team.
[…]# sudo mkdir -p /srv/nfs/{common,project}
[…]# sudo chown  -R  nfs.nfs  /srv/nfs/*
[…]# sudo mount --bind /home/USER/PROJECT  /srv/nfs/project
To make the bind mount(s) permanent, add the following entries to the /etc/fstab file:
[…]# vi /etc/fstab
/home/USER/PROJECT  /srv/nfs/PROJECT   none   bind   0   0
Optional server configuration
NFS server configuration uses 3 files
-
/etc/nfs.conf
-
/etc/nfsmount.conf
-
/etc/idmapd.conf
The commented out lines describe the default built in configuration.
-
Configure the NFS basic directory
[…]$ sudo vi /etc/nfs.conf
/home/USER/PROJECT  /srv/nfs/PROJECT   none   bind   0   0
Activation
-
Firewall configuration
NFS uses port 2049 which is blocked in a Fedora standard installation by defaut.
[…]# firewall-cmd --permanent --add-service=nfs […]# firewall-cmd --reload -
Start NFS enabling autostart at boot time
[…]# systemctl enable nfs-server --now
[…]# systemctl status nfs-server
This starts the NFS server only, but not the NFS client. Therefore, the server can not mount file ressources provided by another server. If required, additionally execute at first `systemctl enable nfs-client.target --now`. For additional details you may look at `man 7 nfs.systemd`.
-
Check availabe NFS capabilities
Fedora enables versions 3 and 4.x, version 2 is disabled. The latter is pretty old now. Every machine should provide at least version 3.
[…]# cat /proc/fs/nfsd/versions
-2 +3 +4 +4.1 +4.2
So the NFS server supports versions 3 and all version 4 capabilities.
File resource configuration
NFS provides 2 options to configure which directores and files to share
- /etc/exports
-
the "traditional" grand all-in-one configuration file
- /etc/exports.d
-
the new way, a directory to collect a set of specific configuration files, which is read file by file at startup. These files must have the extension *.exports. The format is the same as the grand configuration file.
You can use both options in parallel with the grand configuration file read in first. We will use the modern form only.
Configuration by example
- Example 1
-
Export the directory /srv/nfs/common with everyone, i.e. every network device and every user, can access with Read/Write and Synchronize access
[…]$ sudo vi /etc/exports.d/common.exports <i(nsert)> /etc/nfs/common *(rw,sync) - Example 2
-
Export the directory /srv/nfs/common with everyone, i.e. every network device and every user, can access with Read/Write and Synchronize access
[…]$ sudo vi /etc/exports.d/common.exports <i(nsert)> /etc/nfs/common *(rw,sync) - Example 3
-
Export the directory /srv/nfs/common with everyone, i.e. every network device and every user, can access with Read/Write and Synchronize access
[…]$ sudo vi /etc/exports.d/common.exports <i(nsert)> /etc/nfs/common *(rw,sync) - Example 4
-
Export the directory /srv/nfs/common with everyone, i.e. every network device and every user, can access with Read/Write and Synchronize access
[…]$ sudo vi /etc/exports.d/common.exports <i(nsert)> /etc/nfs/common *(rw,sync) - Example 6
-
Export the directory /srv/nfs/projects with all users of a specific network device with Read/Write and Synchronize access
[…]$ sudo vi /etc/exports.d/projects.exports
<i(nsert)>
/etc/nfs/common *(rw,sync)
Connection options
Each default for every exported file system must be explicitly overridden. For example, if the rw option is not specified, then the exported file system is shared as read-only.
For basic options of exports Option Description
- rw/wo
-
Allow both read and write requests / only read requests on a NFS volume.
- sync/async
-
Reply to requests only after the changes have been committed to stable storage (Default) / allow the NFS server to violate the NFS protocol and reply to requests before any changes made by that request have been committed to stable storage.
- secure/insecure
-
Require that requests originate on an Internet port less than IPPORT_RESERVED (1024). (Default) / accepts all ports. using the insecure option allows clients such as Mac OS X to connect on ports above 1024. This option is not otherwise "insecure".
- wdelay/no_wdelay
-
Delay committing a write request to disc slightly if it suspects that another related write request may be in progress or may arrive soon. (Default) This option has no effect if async is also set. The NFS server will normally delay committing a write request to disc slightly if it suspects that another related write request may be in progress or may arrive soon. This allows multiple write requests to be committed to disc with the one operation which can improve performance. If an NFS server received mainly small unrelated requests, this behaviour could actually reduce performance, so no_wdelay is available to turn it off.
- subtree_check/no_subtree_check
-
This option enables subtree checking. (Default) This option disables subtree checking, which has mild security implications, but can improve reliability in some circumstances.
- root_squash/no_root_squash
-
Map requests from uid/gid 0 to the anonymous uid/gid. Note that this does not apply to any other uids or gids that might be equally sensitive, such as user bin or group staff. Turn off root squashing. This option is mainly useful for disk-less clients.
- all_squash/no_all_squash
-
Map all uids and gids to the anonymous user. Useful for NFS exported public FTP directories, news spool directories, etc. Turn off all squashing. (Default)
- anonuid=UID
-
These options explicitly set the uid and gid of the anonymous account. This option is primarily useful for PC/NFS clients, where you might want all requests appear to be from one user. As an example, consider the export entry for /home/joe in the example section below, which maps all requests to uid 150.
- anongid=GID
-
Read above (anonuid=UID)
Setting the crossmnt option on the main psuedo mountpoint has the same effect as setting nohide on the sub-exports: It allows the client to map the sub-exports within the psuedo filesystem. These two options are mutually exclusive.
Administration
When the nfs service starts, the /usr/sbin/exportfs command launches and reads this file, passes control to rpc.mountd (if NFSv2 or NFSv3) for the actual mounting process, then to rpc.nfsd where the file systems are then available to remote users.
When issued manually, the /usr/sbin/exportfs command allows the root user to selectively export or unexport directories without restarting the NFS service. When given the proper options, the /usr/sbin/exportfs command writes the exported file systems to /var/lib/nfs/xtab. Since rpc.mountd refers to the xtab file when deciding access privileges to a file system, changes to the list of exported file systems take effect immediately.
The following is a list of commonly used options available for /usr/sbin/exportfs:
-r — Causes all directories listed in /etc/exports to be exported by constructing a new export list in /etc/lib/nfs/xtab. This option effectively refreshes the export list with any changes that have been made to /etc/exports.
-a — Causes all directories to be exported or unexported, depending on what other options are passed to /usr/sbin/exportfs. If no other options are specified, /usr/sbin/exportfs exports all file systems specified in /etc/exports.
-o file-systems — Specifies directories to be exported that are not listed in /etc/exports. Replace file-systems with additional file systems to be exported. These file systems must be formatted in the same way they are specified in /etc/exports. Refer to Section 18.7, “The /etc/exports Configuration File” for more information on /etc/exports syntax. This option is often used to test an exported file system before adding it permanently to the list of file systems to be exported.
-i — Ignores /etc/exports; only options given from the command line are used to define exported file systems.
-u — Unexports all shared directories. The command /usr/sbin/exportfs -ua suspends NFS file sharing while keeping all NFS daemons up. To re-enable NFS sharing, type exportfs -r.
-v — Verbose operation, where the file systems being exported or unexported are displayed in greater detail when the exportfs command is executed.
If no options are passed to the /usr/sbin/exportfs command, it displays a list of currently exported file systems.
Using exportfs with NFSv4
The exportfs command is used in maintaining the NFS table of exported file systems. When typed in a terminal with no arguments, the exportfs command shows all the exported directories.
Since NFSv4 no longer utilizes the rpc.mountd protocol as was used in NFSv2 and NFSv3, the mounting of file systems has changed.
An NFSv4 client now has the ability to see all of the exports served by the NFSv4 server as a single file system, called the NFSv4 pseudo-file system. On Red Hat Enterprise Linux, the pseudo-file system is identified as a single, real file system, identified at export with the fsid=0 option.
For example, the following commands could be executed on an NFSv4 server:
mkdir /exports
mkdir /exports/opt
mkdir /exports/etc
mount --bind /usr/local/opt /exports/opt
mount --bind /usr/local/etc /exports/etc
exportfs -o fsid=0,insecure,no_subtree_check gss/krb5p:/exports
exportfs -o rw,nohide,insecure,no_subtree_check gss/krb5p:/exports/opt
exportfs -o rw,nohide,insecure,no_subtree_check gss/krb5p:/exports/etc
In this example, clients are provided with multiple file systems to mount, by using the --bind option which creates unbreakeable links.
Because of the pseudo-file systems feature, NFS version 2, 3 and 4 export configurations are not always compatible. For example, given the following directory tree:
/home
/home/sam
/home/john
/home/joe
and the export:
/home *(rw,fsid=0,sync)Using NFS version 2,3 and 4 the following would work:
mount server:/home /mnt/home
ls /mnt/home/joe
Using v4 the following would work:
mount -t nfs4 server:/ /mnt/home
ls /mnt/home/joe
The difference being "server:/home" and "server:/". To make the exports configurations compatible for all version, one needs to export (read only) the root filesystem with an fsid=0. The fsid=0 signals the NFS server that this export is the root.
/ *(ro,fsid=0)
/home *(rw,sync,nohide)
Now with these exports, both "mount server:/home /mnt/home" and "mount -t nfs server:/home /mnt/home" will work as expected.
Testing the configuration
On client side:
[…]# showmount -e 192.168.12.200On client side, try to mount an exported subdirectory:
[…]# mount 192.168.1.200:/nfsfileshare /mnt/nfsfileshareDisplay the active mounts
[…]# mount | grep nfs
sunrpc on /var/lib/nfs/rpc_pipefs type rpc_pipefs (rw,relatime)
nfsd on /proc/fs/nfsd type nfsd (rw,relatime)
192.168.12.5:/nfsfileshare on /mnt/nfsfileshare type nfs4 (rw,relatime,vers=4.1,rsize=262144,wsize=262144,namlen=255,hard,proto=tcp,port=0,timeo=600,retrans=2,sec=sys,clientaddr=192.168.12.7,local_lock=none,addr=192.168.12.5)
Check if the NFS mount is writable
[…]# touch /mnt/nfsfileshare/testFurther reading
-
Upstream documentation: http://linux-nfs.org/wiki/index.php/Main_Page
-
Linux manual page: https://man7.org/linux/man-pages/man5/exports.5.html
Want to help? Learn how to contribute to Fedora Docs ›