Fedora on Rented Server – The Example of Hetzner Data Center
|
Status: Work in progress |
Installation of a standalone server on rented hardware in an external data center is suitable for small and medium-sized enterprises and self-employed entrepreneurs, but also in the private sector. Using the Hetzner data center as an example, the installation steps in such a runtime environment are explained, each with the underlying guideline (best practice).
1. Why rent a dedicated server?
Even though cloud services, virtual servers, SAAS are on everyone’s lips, complete control over hardware and software is attractive or even indispensable for companies and also private individuals in many cases. Data protection and confidentiality considerations, special software needs, or simply the joy of experimentation are reasons for doing so.
Rental servers in a data centre offer the advantage of a professional set-up and, above all, a technically optimal internet connection, as it can be afforded on one’s own premises only by large corporations. They are offered by various companies. This guide is based on an offer from Hetzner, a large European company, which offers among others quite affordable options through its "Server Auction". In principle, the instructions can be adopted to offers from other providers.
2. Planning ahead
The objective is to install and maintain a server that is not directly accessible locally. Various publicly accessible services are to be offered securely and reliably. These include standard services such as mail and web applications, but also sector-specific software.
The most important guideline is to carefully seal off access to the server as far as possible. It must be prevented by all means that it can be compromised or even hijacked. Due to the remote, not directly accessible location, a failure of unobstructed access is comparatively laborious to remedy and thus "expensive". Appropriate measures are:
-
Access to the server exclusively via ssh and key-based identification
-
The server operates exclusively as a "host" for public services without offering them directly
-
All services such as mail or web are encapsulated and run either in virtual machines or a container (frontend as guest system)
-
No accounts or only a few accounts required for system maintenance are created on the host itself. All other accounts required are placed in a guest system.
-
Internal processing of data can be performed directly on the server (backend). This is particularly useful for I/O-intensive applications such as a database for performance reasons.
-
Communication between VMs, containers and backend takes place via a protected internal, non-public network.
2.1. Storage
The aforementioned provisions are largely "best practice" for any server installation today, but become even more important when outsourcing off premise.
Hetzner rental servers are usually operated with a local hard disk or 2 disks in a RAID array. The strict separation of system and user data under this condition also serves to make administration as simple as possible. The system area, i.e. the operating system including installed utility programs and software such as a database system, must be maintainable completely independently of the storage of user data. System maintenance must not jeopardise user data under any circumstances. If necessary, it must be possible to unmount user data.
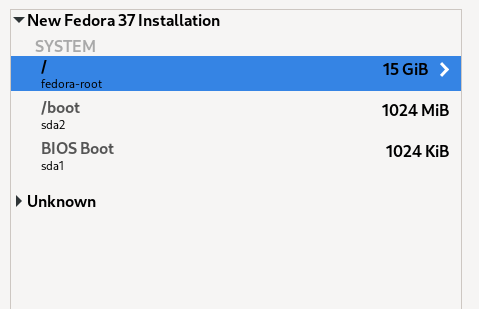
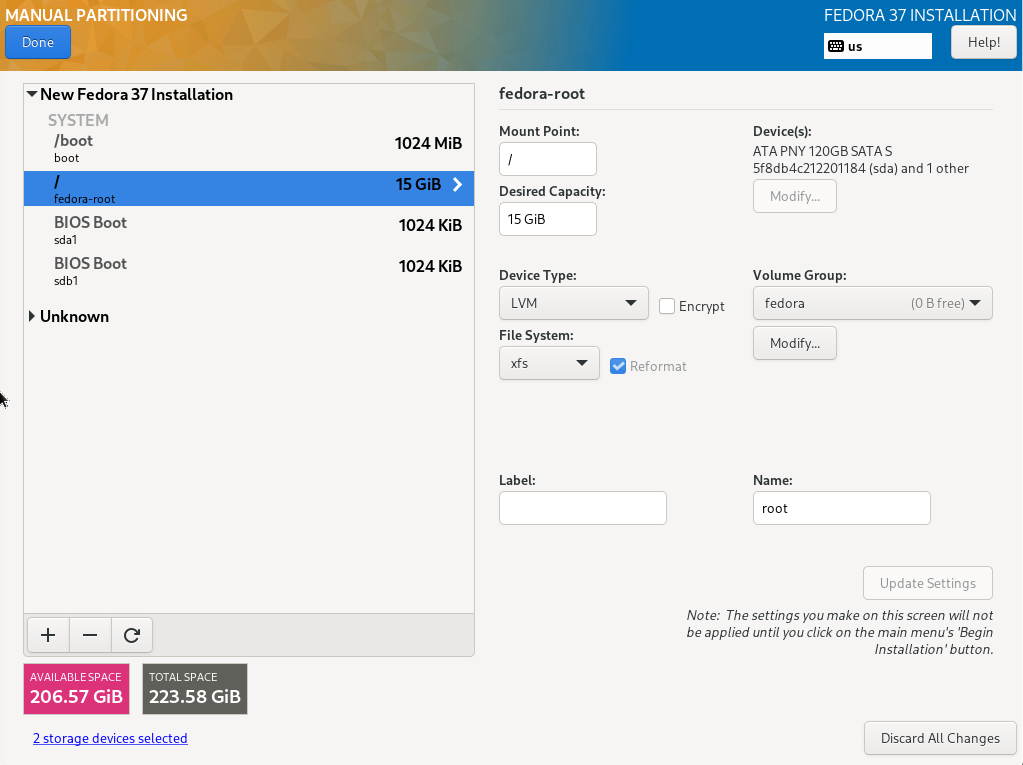
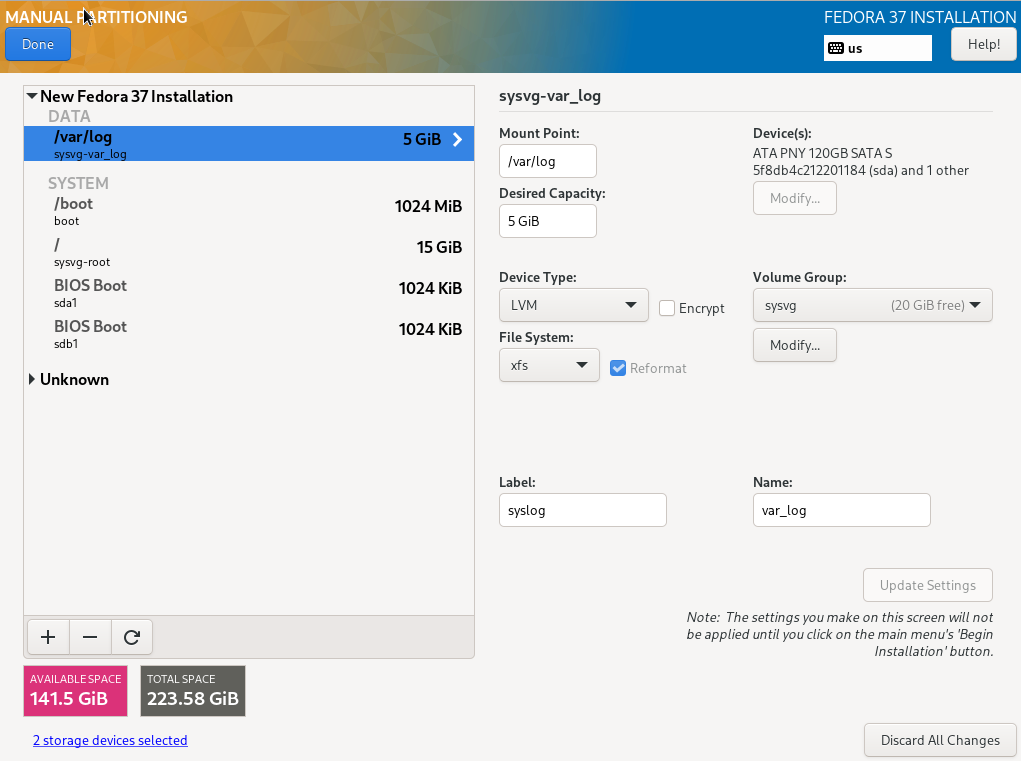
For precisely this reason, Fedora Server creates by default a small /boot partition and in the remaining area a partition with a volume group (VG). Therein, a logical volume of approx. 15 GB (the exact value depends on the disk capacity) is created for the operating system and its software. The other available space remains free for the creation of logical volumes (LVs) for user data, which are mounted in the appropriate positions in the directory tree of the system area (details later).
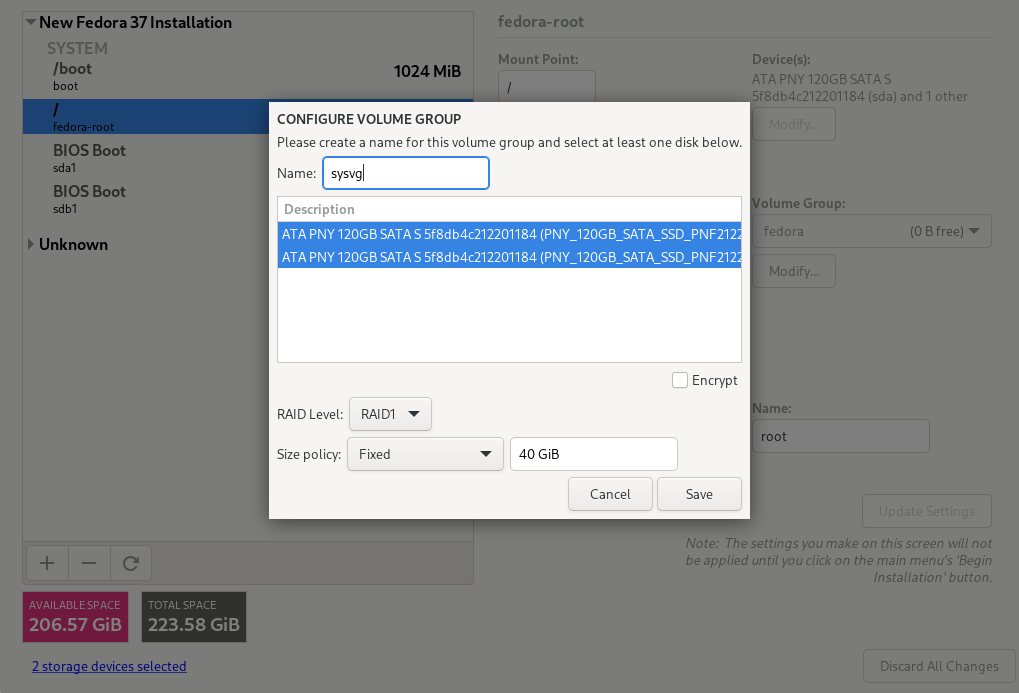
We will go a little further and create another small partition and VG for the operating system in addition to the partition for /boot (sysvg approx. 30 GiB). LVs for the directory tree and additional runtime environment are created therein and free space is left for disposal as needed. The remaining area of the hard disk is filled by a large partition and VG for user data (usrvg). Similar to the standard partition, all user data is created as LVs in usrvg and mounted in corresponding directories of the system area. This is the maximum possible separation of system and user data if only one hard disk is available.
2.2. Network
By default, the internal network is configured with DHCP and without DNS. To enable communication of the VMS with each other and with the host, a DNS is advantageous, which enables addressing by name.
For this purpose, a domain name must also be defined for the internal network. A top-level ".local" is explicitly not recommended, nor is an official top-level name. For example, you can take the official domain name and replace the top-level domain with 'lan' or 'internal'. The example domain example.com then becomes example.lan. This is done in the configuration file via the parameter <domain name='example.lan'/>.
It is a peculiarity of the Hetzner infrastructure that all IP addresses assigned to a server are routed to its physical Ethernet interface, i.e. its MAC address. For IPv4, it is possible to define additional MAC addresses for this interface, but not for IPv6. If virtual machines are to be available with both address families, which is the standard today, a conventional bridge (which works with MAC addresses) is not sufficient. The bridge must route based on the IP address (bridge in routing mode or brouter). The configuration is a bit more complex.
3. Preparations
3.1. Preparations made in Hetzner Web Interface
Login into your Hetzner account, select “Server” from the left-hand menu and expand your server.
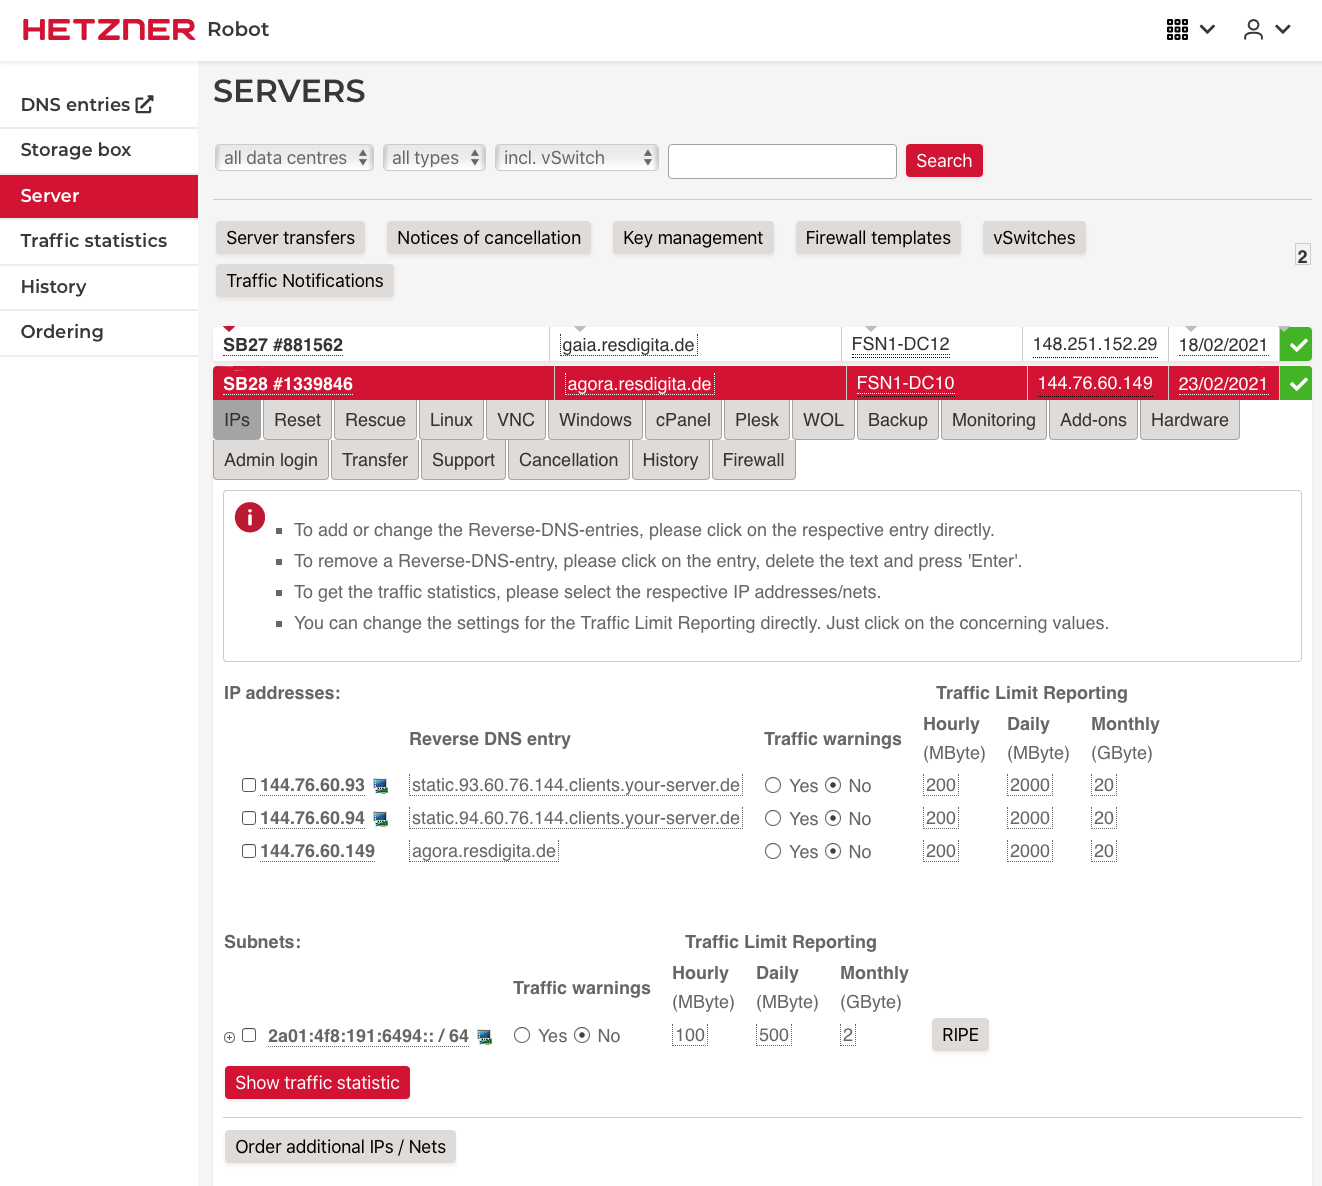
When you rent the server you get a /64 IPv6 subnet, but only one single IPv4 address. If you plan to use publicly available virtual machines with both IPv4 and IPv6 (dual stack, what you definitely want these days), you need more IPv4 addresses. You can order either various single IP addresses or an IPv4 subnet using the order button at the bottom. They offer no technical disadvantage and avoid "wasting" (and costing) unusable IPs (for network and broadcast). In this tutorial we will use additional single IP addresses. On the screenshot above you see 2 single IPs added.
For IPv6, the host receives a /64 subnet range. The host address is fixed u.v.w.x::2.
4. Basic Installation
Hetzner offers various ways to install the operating system. Fedora is installable only via
-
VNC (Virtual Network Computing)
-
KVM remote console (Keyboard, Video and Mouse over-IP)
Via VNC you often don’t get the latest Fedora version. And it used to be based on the everything DVD. You can select ‚Fedora Server‘ from the options list, but it is not the Fedora Server Edition. You miss various Server Edition specific defaults.
So it is recommended to use KVM console. It is not permanently connected to a server. You must order it from Hetzner Support for a limited period of time. It is free of charge for 3 hours, which is quite sufficient for an installation.
4.1. Working with the Hetzner KVM Console
-
Order a KVM console
klick on „Support“ in the servers Web interface. Product type „Server“ should already be selected as well as your server if you have only one. At the bottom click on „Remote Console“. The lower part of the screen expands and an order form is displayed.
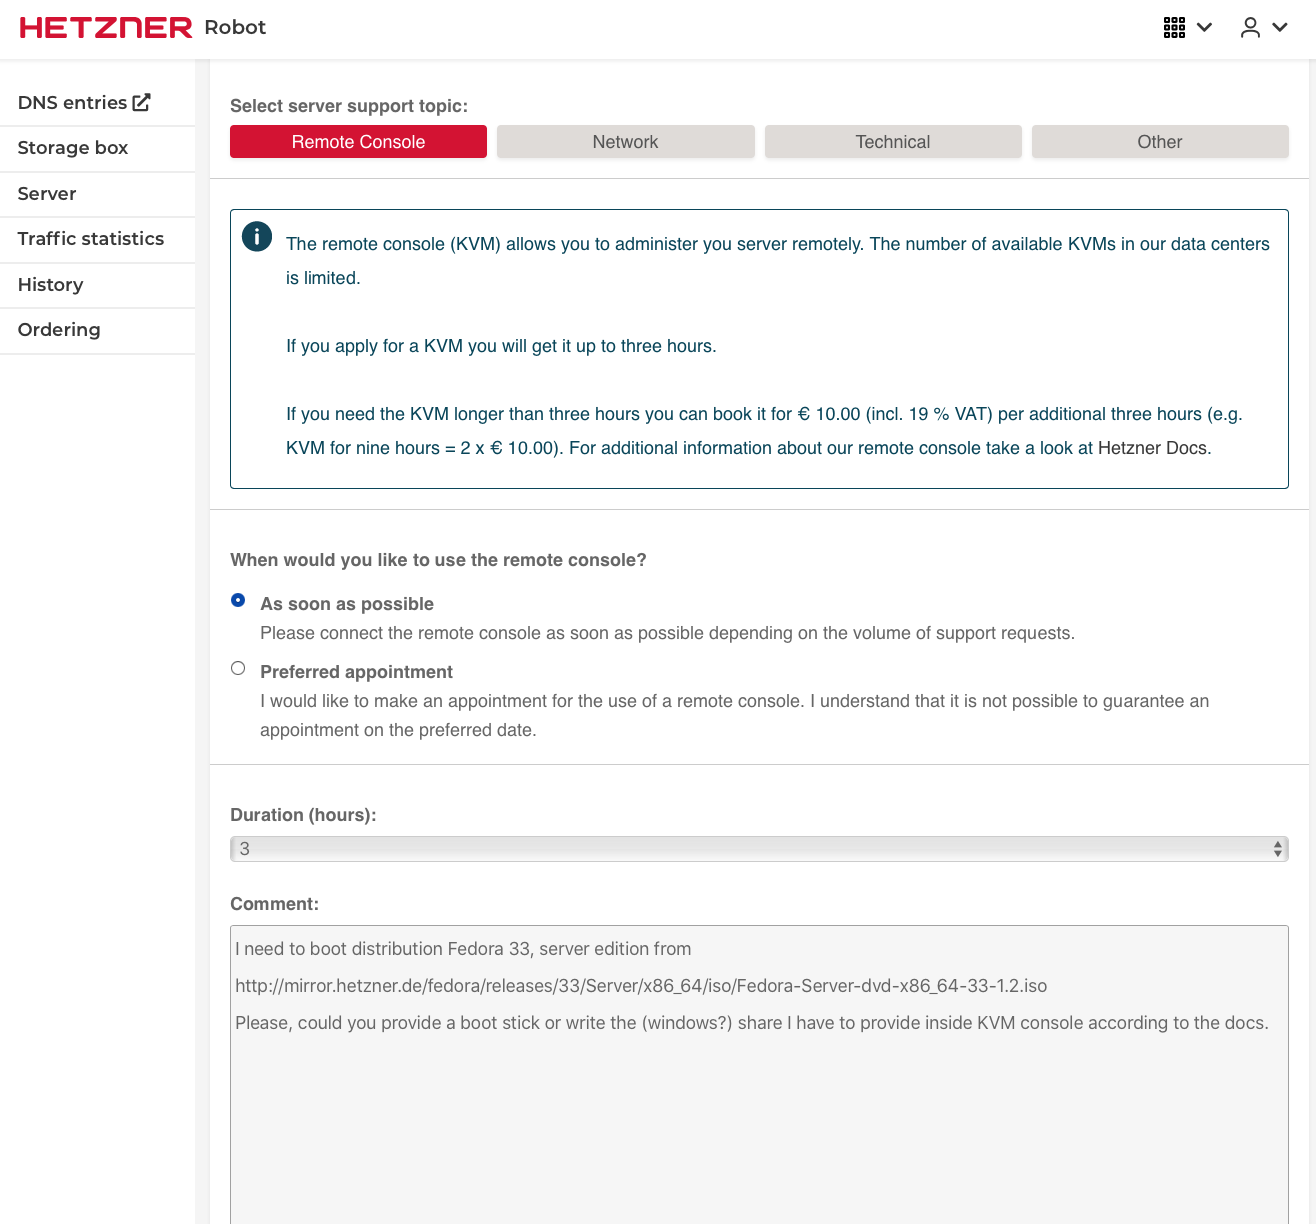
Fill in the form as needed and submit the request. The Hetzner mirror includes all Fedora versions. You find Fedora Server at http://mirror.hetzner.de/fedora/releases/33/Server/x86_64/iso/Fedora-Server-dvd-x86_64-33-1.2.iso. Usually the technicians provide a USB stick. Otherwise you need the share name.
Hetzner has several different KVM models in use. Some require Java 8, be prepared to install that if needed.
-
Reboot the server
You get an email from Hetzner support when your KVM console is connected and ready. Now it is time to reboot your server. The most simple way is to use the Hetzner Robot Reset service.
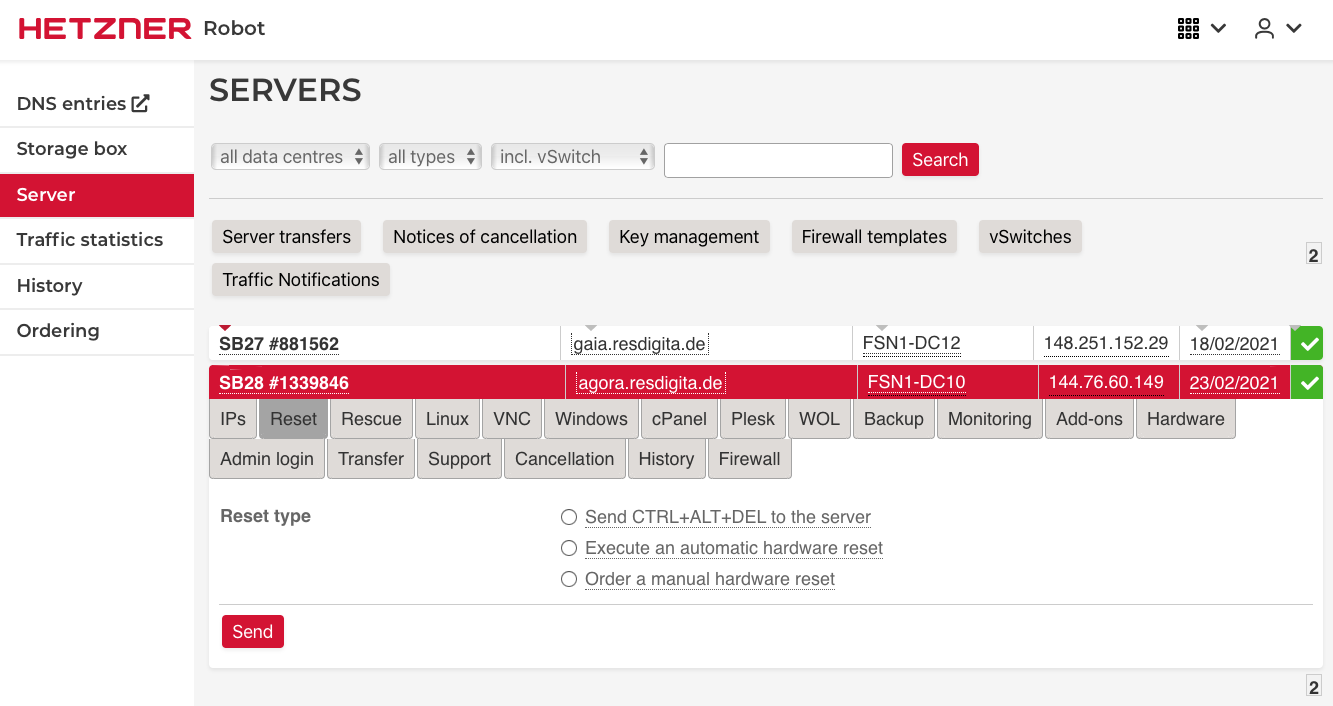
Usually you will use the "Execute an automatic hardware reset" option.
-
Login in to the KVM console
Wait some minutes for reboot to complete and then open the address provided in the "remote console is ready" email in your Web browser. You should be greeted by the login screen.The email include the KVM address, user name and password. Open the address in your browser.
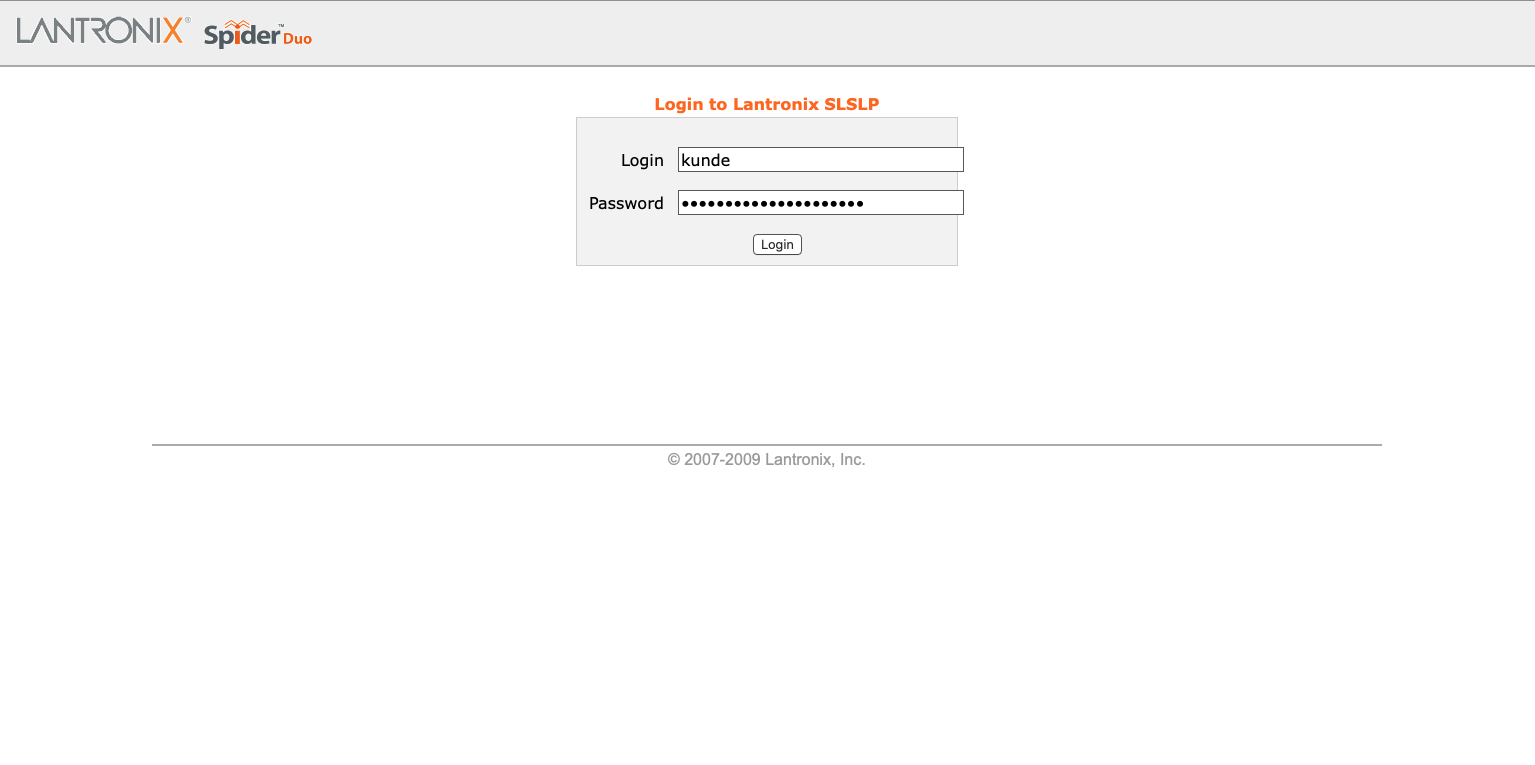
It is best to use Firefox. Some other browser don’t work correctly, e.g. Safari on some macOS versions.
-
Connect to your Servers console
Upon successful login, the console automatically connects to the server console. What you see exactly depends on the current status of the server.
- New server in deployment mode
-
With a new server, the hard disks are empty and not bootable. The server boots the Fedora installation system from the provided USB drive and you will either see various boot messages scrolling across the screen or already the language selection menu of the Anaconda installer.

Clicking into the thumb image activates the console connection. The thumb image is replaced with an active screen that fills the entire view port.
You can start the Fedora installation as you are accustomed to, following section 4.2.
- Server in some operationl mode
-
When reinstalling an existing server with Fedora, you are either on that servers system console login screen or in the BIOS system. If you are still able to login into the server, it would probably best todelete the boot partitions so you get a non-bootable disk setting. When yozu reboot, the server should automatically boot from the USB drive.In the BIOS mode youm must fugure out how to boot from the USB drive.
If you are successful you will see the Fedora boot screen that will automatically start he Anaconda installation program.
4.2. Interactive system installation
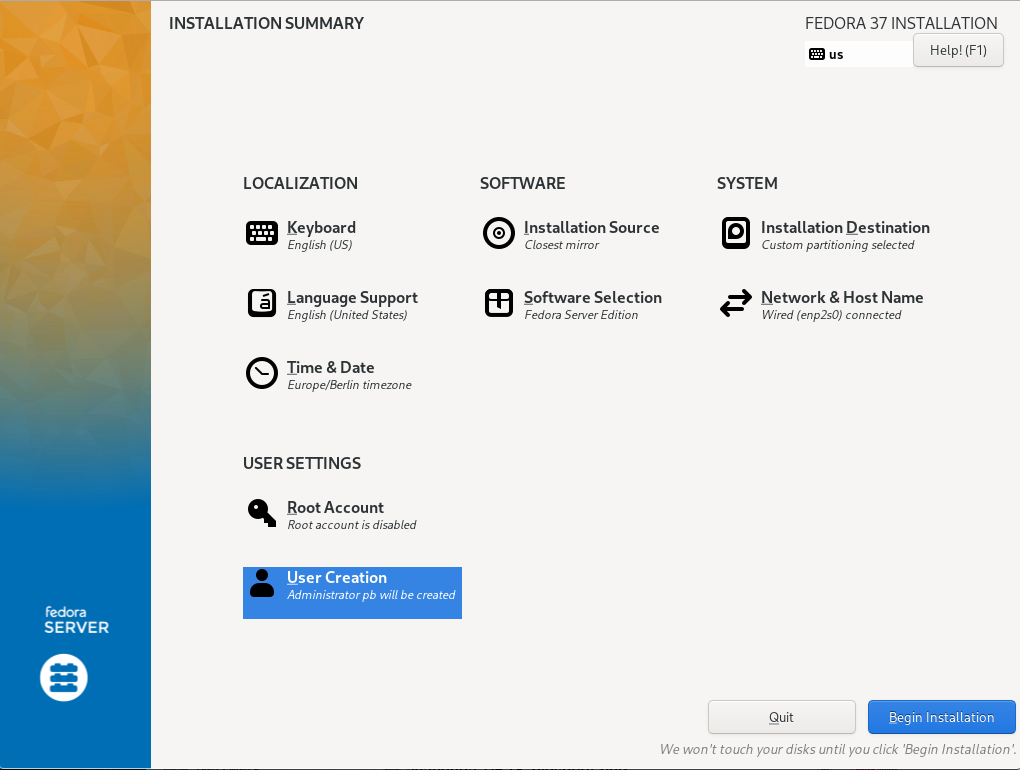
After selecting the language, you will be taken to the familiar initial Anaconda installation summary.
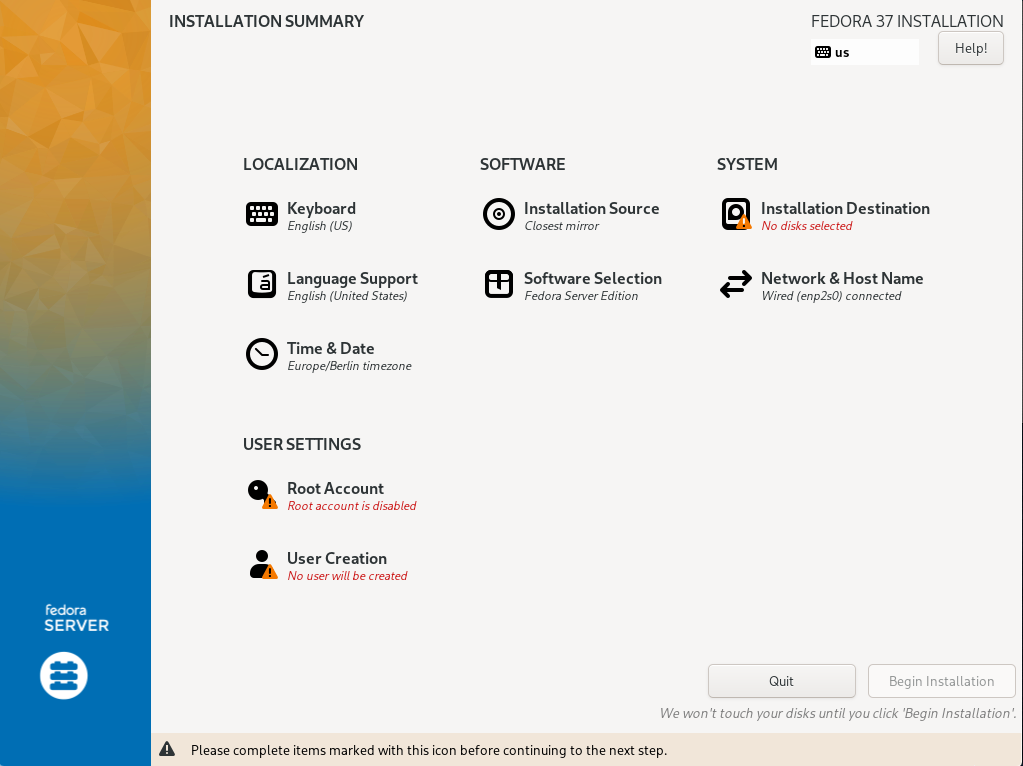
Most of it is already correctly preset.
It is nevertheless useful to briefly check the items "Keyboard Layout", "Language Support", "Software Selection" (Fedora Server without additional options), and "Time & Date" (Check that an NTP server is configured as well). Don’t modify „Installation Source“. The remaining items require more intensive work.
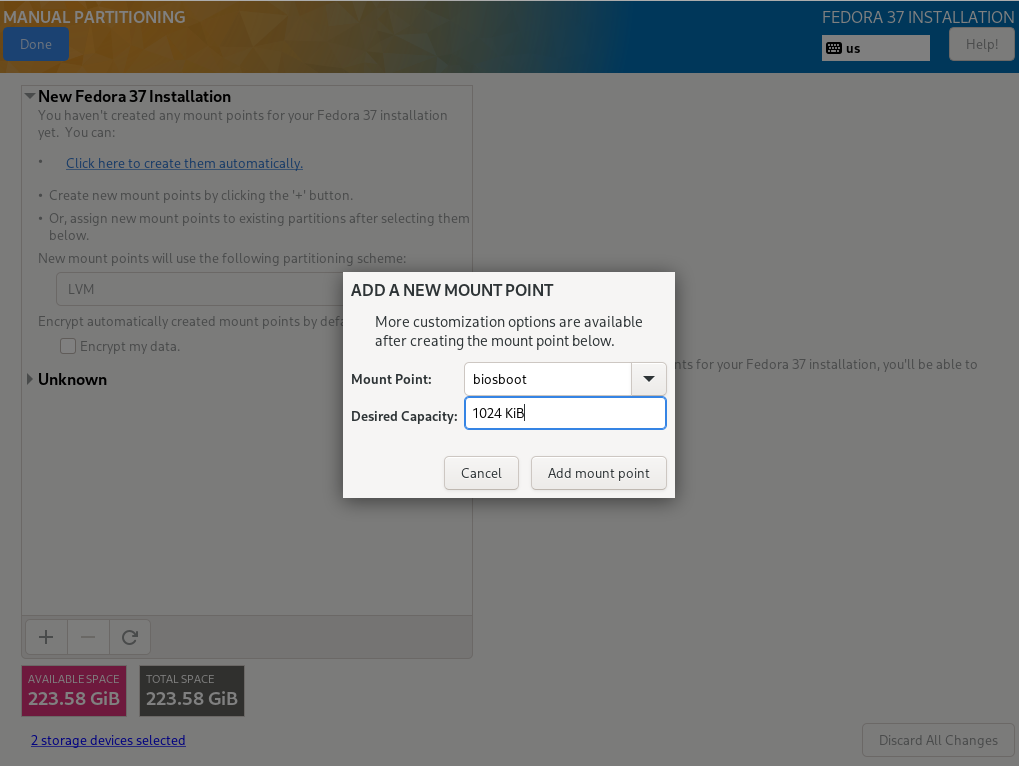
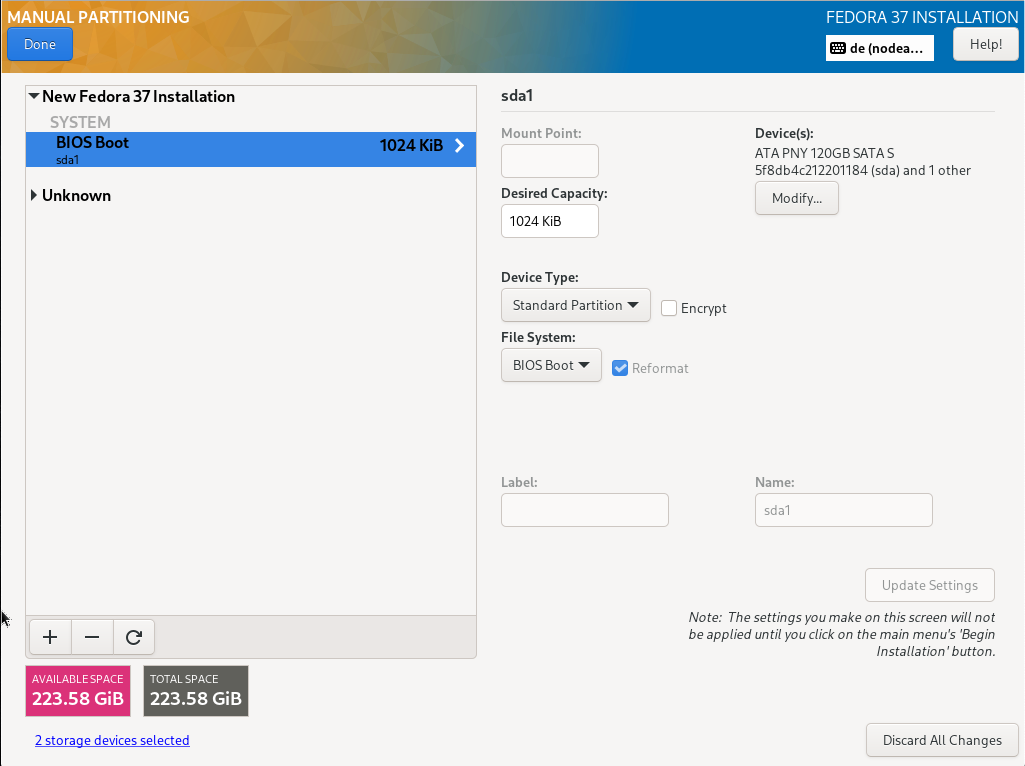
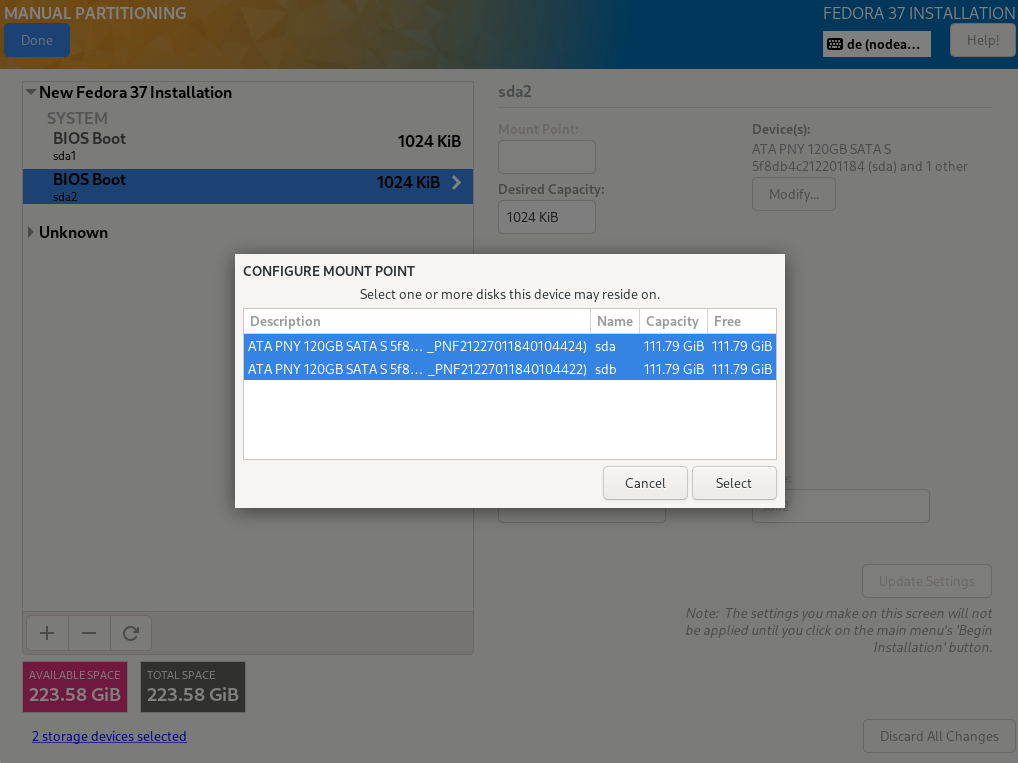
4.2.1. Disk configuration
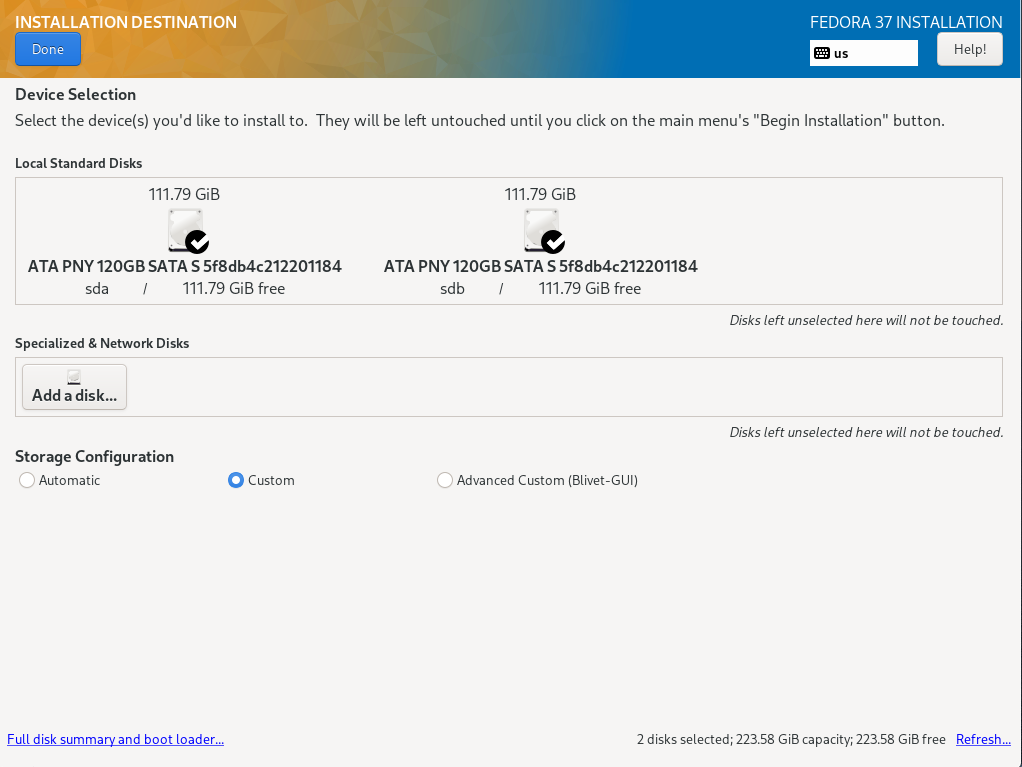
Selecting the item „Installation Destination“, a selection of the disks and the configuration options are displayed
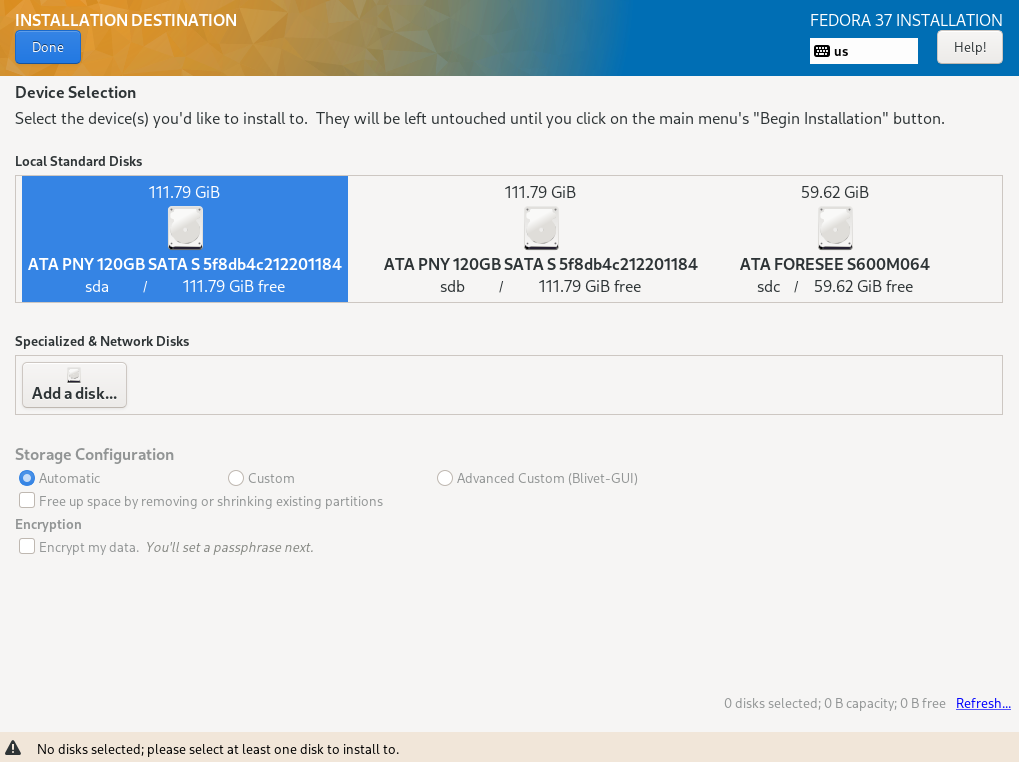
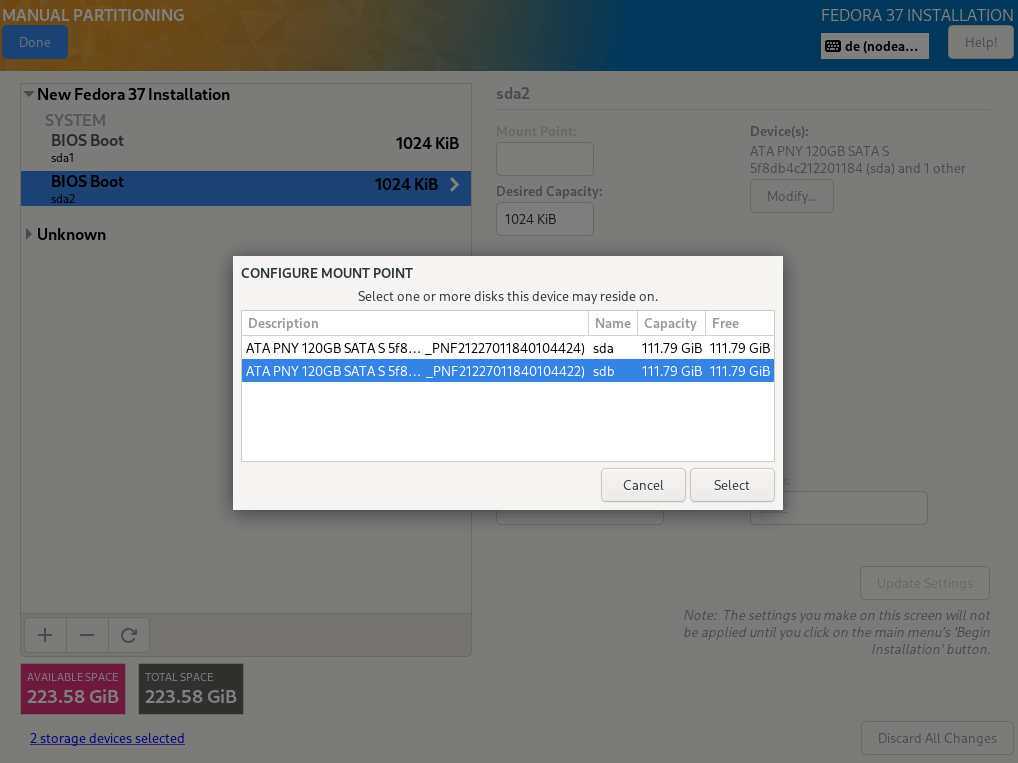
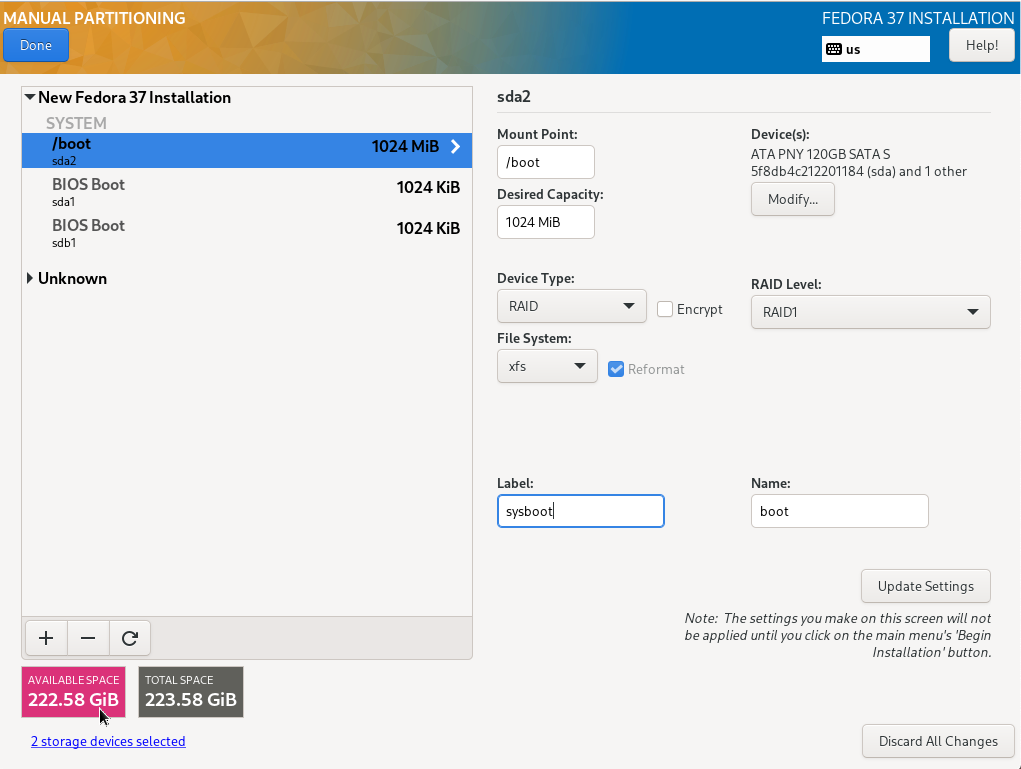
Both installed hard disks must be selected. For configuration, „Advanced Custom (Blivet-GUI)" has to be selected.
TBD Disk set up
TBD

TBD
TBD
TBD
TBD

TBD
TPD
TBD

TBD

TBD
TBD

TBD
TBD
TBD

TBD (64)
TBD (70):
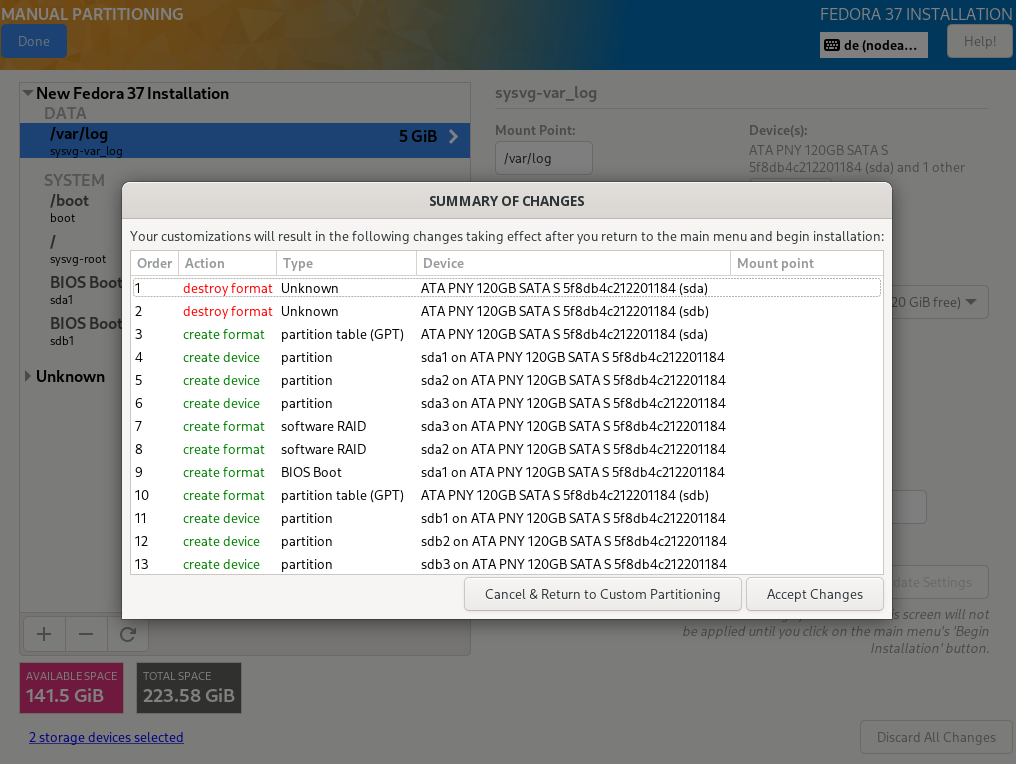
Selecting "Done" in the upper left corner leads to the next step, where the setup can be completely checked again.
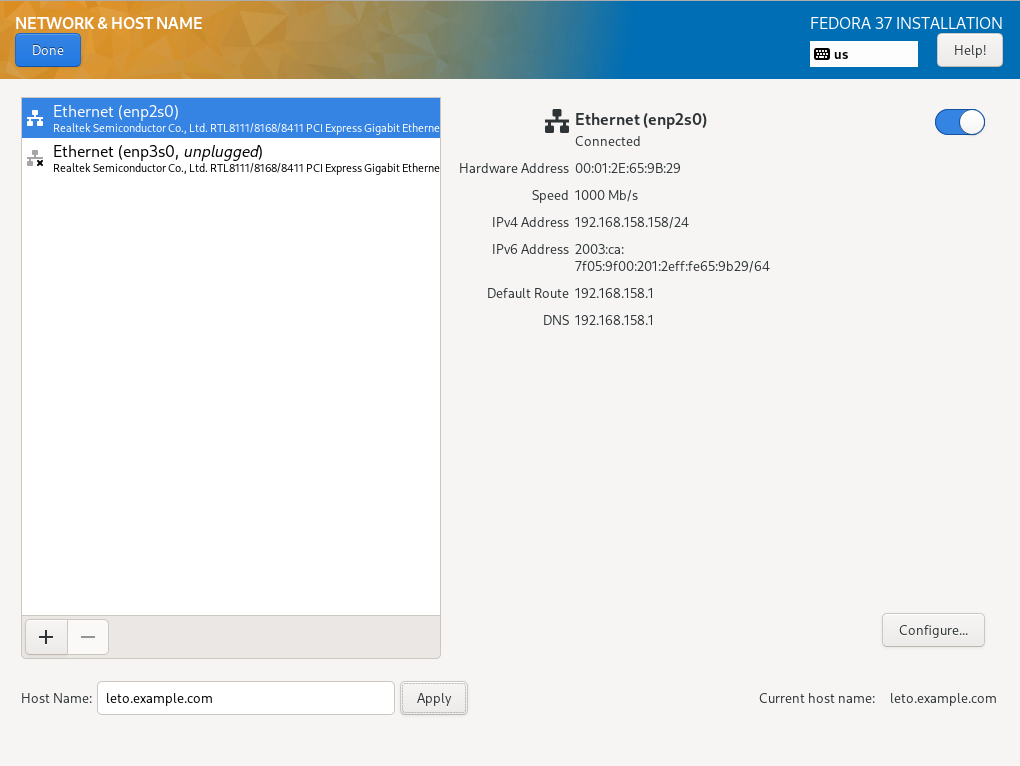
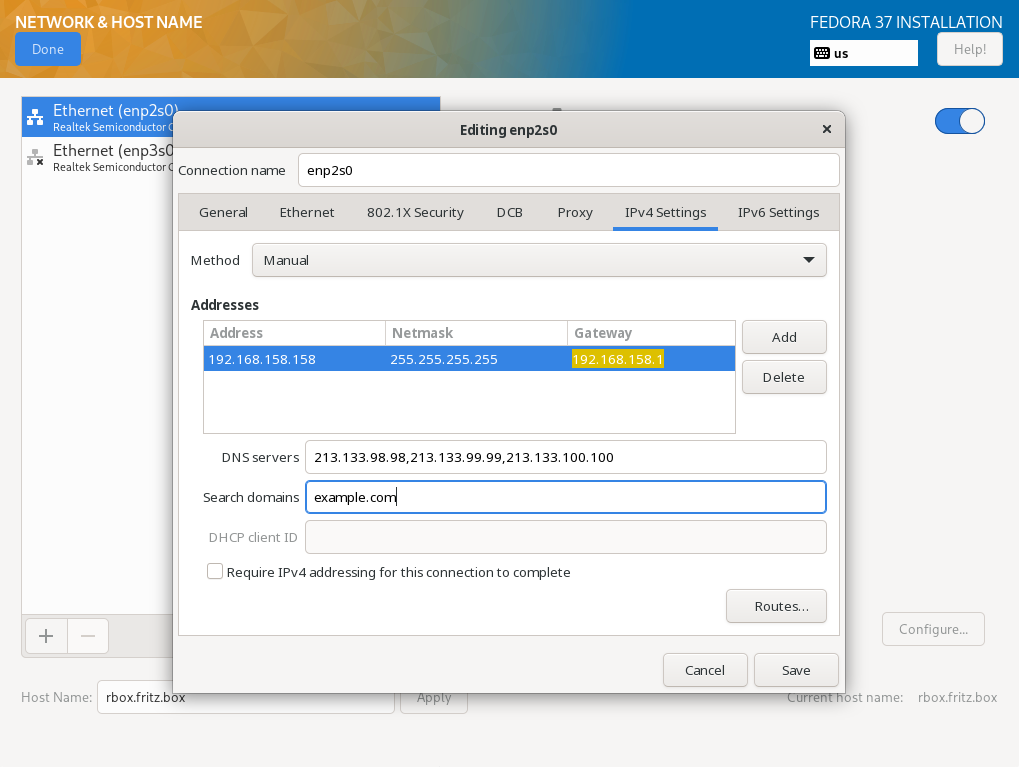
4.2.2. Network connectivity
The next step is to configure the network connection. It is only important to insert the complete name as specified in the DNS into the "Host Name" field . An IPv4 connection is already set up via DHCP, an IPv6 connection is easier to configure later via the terminal.
TBD (802)
TBD (812)
TBD (822)

TBD
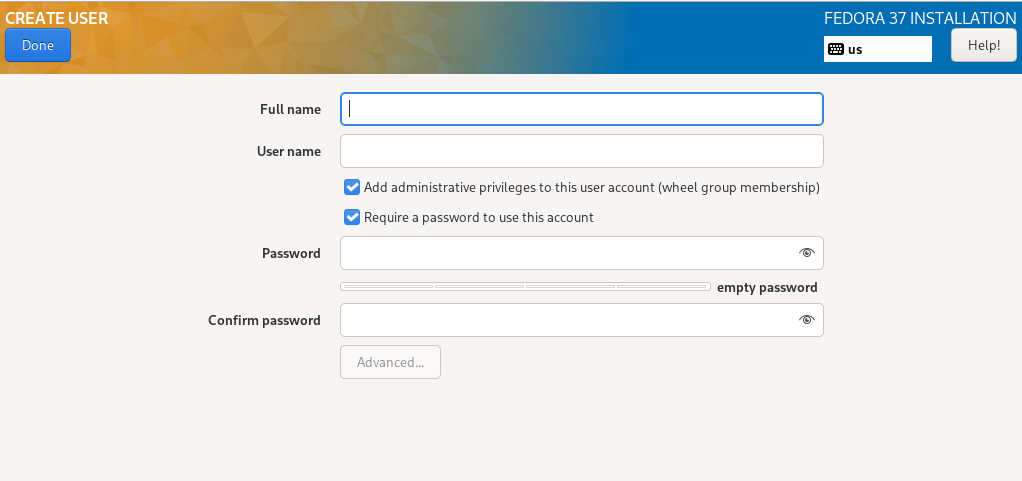
Finally, the details for root and another user must be entered.
For user root, the two checkboxes for blocking root access and for allowing an ssh login via password should not be activated under any circumstances. This way, secure access via ssh key file is still an option and, in an emergency, also with a password via a KVM console.
To be able to access the server at all after completing the installation and restarting, it is essential to create another, non-privileged user. In this case, both checkboxes must be activated. This user can then obtain root privileges via sudo and perform administrative tasks.
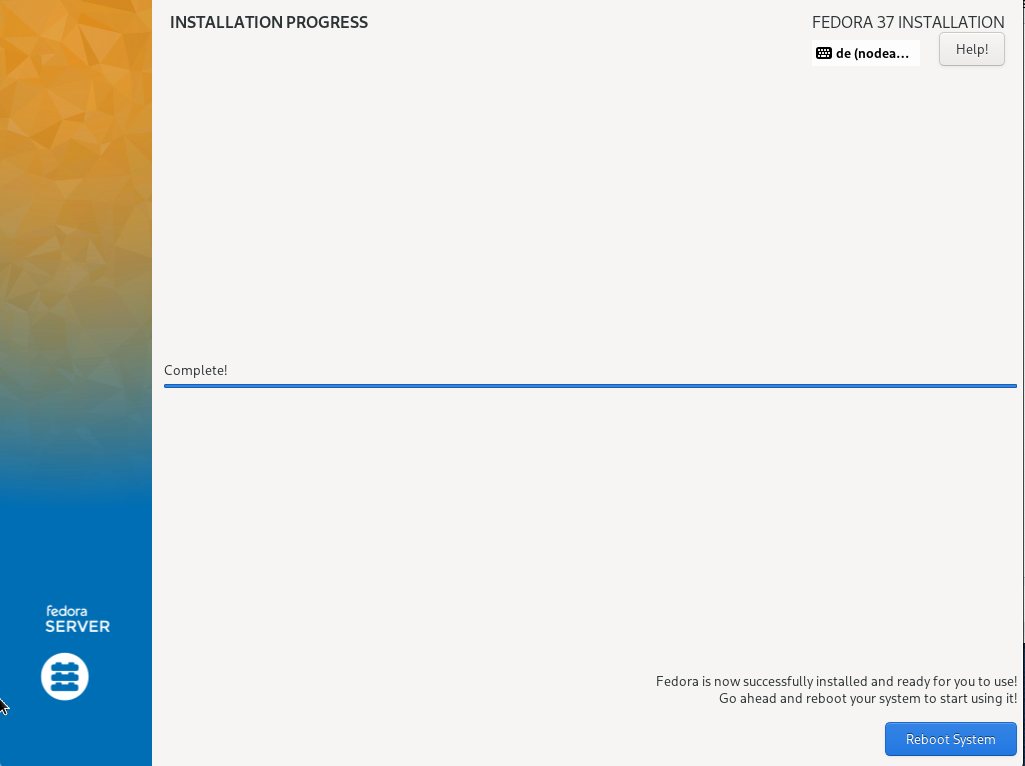
Click on "Begin installation" to run the installation and restart the server after completion.
TBD (998)
Do not release the KVM console yet, it may still be needed for a subsequent step.
TBD
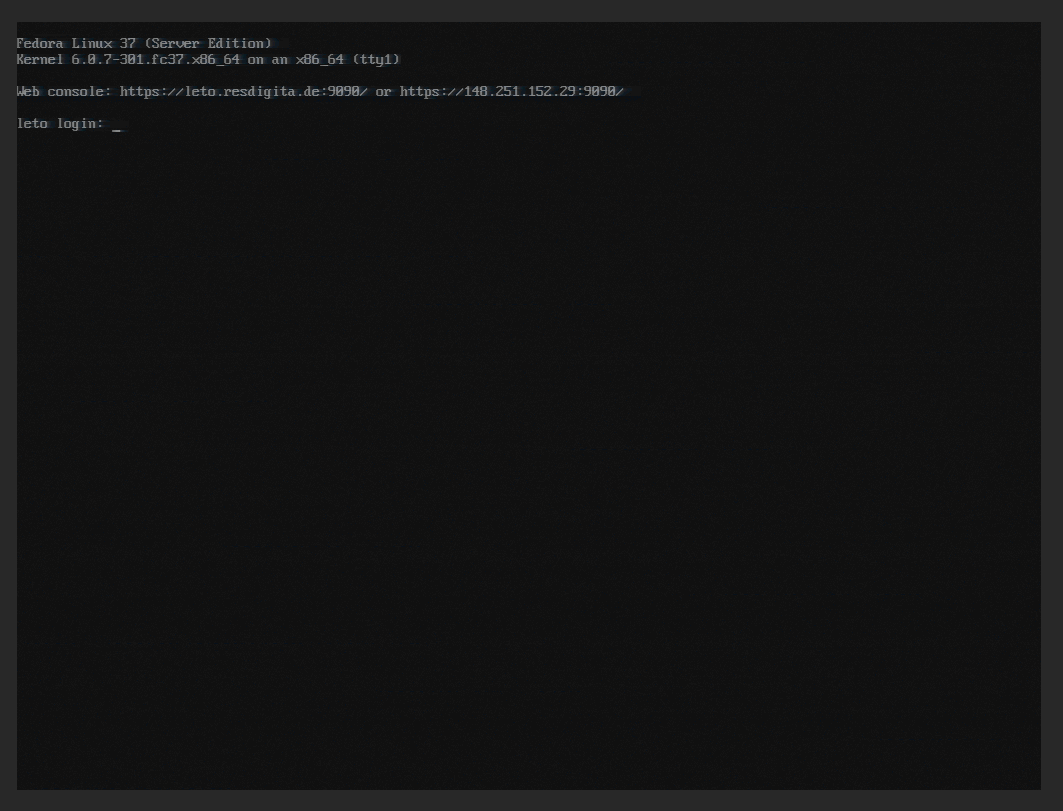
After the installation is complete, the system is restarted. Afterwards, login via ssh (non root) as well as via the Web Admintool Cockpit is available.
4.3. Checkout the installation
| Raw section, not edited yet |
-
Login to the server using the administrative user account as set up durcing installation
[…]$ ssh hostmin@example.comAfter logging in to the server, acquire root permissions
[…]$ sudo su - -
Control of the IP addresses
[…]# ip a 1: lo: <LOOPBACK,UP,LOWER_UP> mtu 65536 qdisc n … 2: enp3s0: <BROADCAST,MULTICAST,UP,LOWER … […]# nmcli con + NAME UUID TYPE DEVICE enp3s0 ccdabaa33b-25b0-3bfd-8a74-b6b40847a7a4 ethernet enp3s0 -
Check on the local desktop if a ping6 works:
[…]# ping6 <YOUR_IPv6_PRAEFIX>::2 […]# # e.g. ping6 2a01:4f8:191:6494::2 -
Check from the local desktop if a ping6 works:
[…]# ping <YOUR_IPv4> -
Perform a reboot. If the server is then accessible via ssh with IPv4 and IPv6, return the KVM console.
[…]# reboot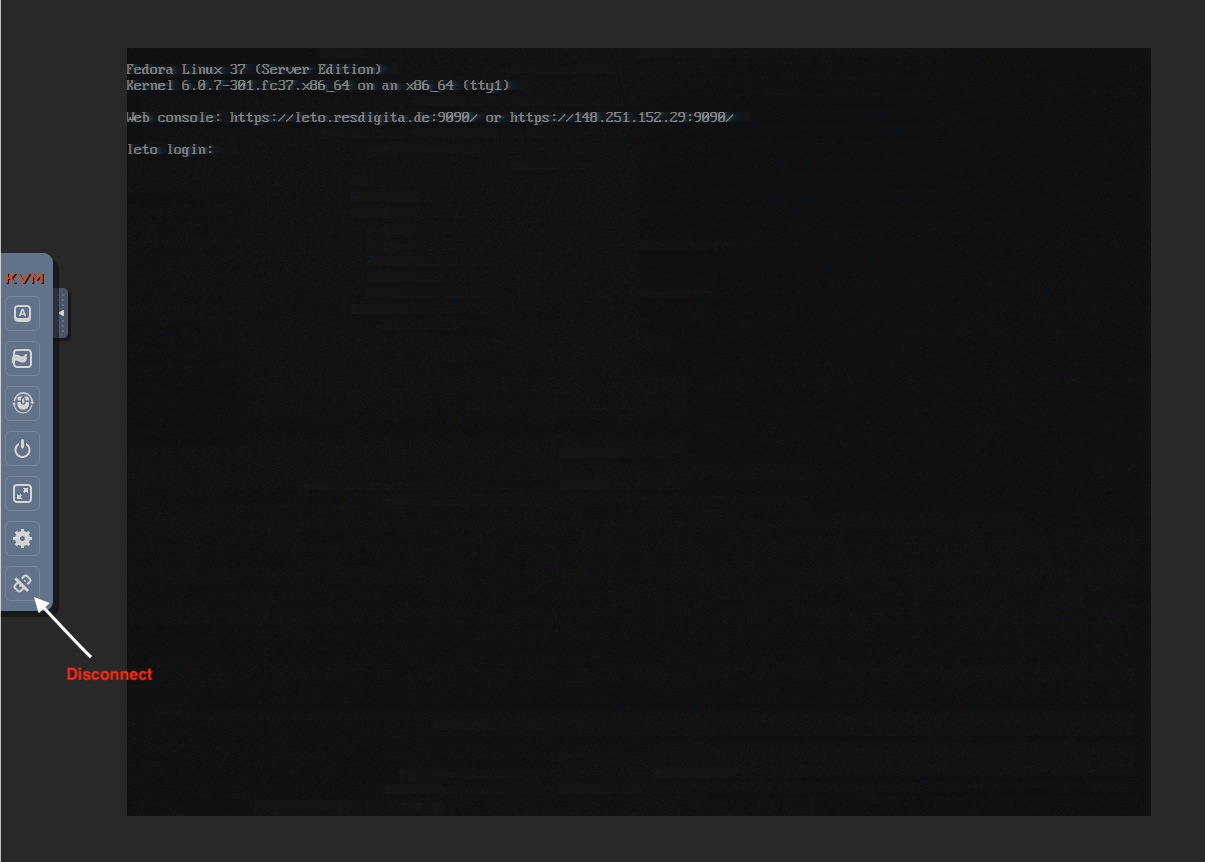
5. Post installation tasks
5.1. Facilitate the administrative user login
Logging on to the server as root is not possible, instead the unprivileged administration account must be used.
A key file for SSH saves the annoying and error-prone typing of the hopefully secure and sufficiently long password. Additionally, you may prepare your local desktop to use a short name instead of having to type in a complete FQN hostname.
-
On your desktop (Linux of macOS), create a SSH keyfile if not already available. It should not be secured by password to enable automatic processing.
[…]# mkdir ~/.ssh […]# cd ~/.ssh […]# ssh-keygen -t rsa -b 4096 -C <YOUR_ACCOUNT>@example.com" -f id_<outputkeyfile>_rsa -
Transfer the key file to your server.
[…]$ ssh-copy-id -i $outputkeyfile.pub <YOUR_ACCOUNT>@host.example.com -
Create a config file on your desktop with a convenient host name for your server.
[…]$ vi ~/.ssh/config Host <MYHOST> Hostname host.example.com User <YOUR_ACCOUNT> ProxyCommand none ForwardAgent no ForwardX11 no Port 22 KeepAlive yes IdentityFile ~/.ssh/$outputkeyfile -
Test the configuration
[…]$ ssh <MYHOST>
5.2. Check Cockpit access
Open Cockpit in your desktops browser
https://host.example.com:9090. Accept the security warning of your browser. Cockpit uses a self signed certificate.
If you disabled root access during installation (recommended), login as root is not possible.
Login with your administrative user account. At the top you will see a warning that the Web Console is running with limited permissions. Enable administrator access so that all administrative privileges are automatically available after login.
5.4. Disable SSH login with password for individual users
A password login can be prevented with little effort. This saves a lot of warning messages in the log file and makes it easier to check them. For individual users, password login is allowed again as a fallback solution in case something goes wrong with the key files.
-
On the server, create a configuration file and edit
[…]# vi /etc/ssh/sshd_config.d/60-local.conf # Local custimization: disable password login except for # one (optionally add some more) user as a fallback option. PasswordAuthentication no Match User hostmin PasswordAuthentication yes #Match User hostmin2 # PasswordAuthentication yes -
Reload the sshd daemon
[…]# systemctl reload sshd -
Test that everything works as expected
-
Is an authorised user able to log in?
-
Are other users rejected with the message "Permission denied (publickey,gssapi-keyex,gssapi-with-mic)"?
-
If this does not work and/or other users are able to log in with a password besides your known authorized user,
-
install the latest updates.
-
check the file /etc/ssh/sshd_config.d/50-redhat.conf to make sure that it does not include the line "PasswordAuthentication yes" (as this is already the default and should not be repeated or else it could hinder other configurations).
-
-
-
Create a configuration file and fill it in as follows:
[…]# vi /etc/ssh/sshd_config.d/60-local.conf # Local custimization: disable password login except for # one (optionally add some more) user as a fallback option. PasswordAuthentication no Match User hostmin PasswordAuthentication yes #Match User hostmin2 # PasswordAuthentication yes -
Reload the sshd daemon
[…]# systemctl reload sshd -
Test that everything works as expected
-
Is an authorised user able to log in?
-
Is anyone else is rejected with the message "Permission denied (publickey,gssapi-keyex,gssapi-with-mic)"?
-
If this does not work: Check whether the latest update has been installed. The file /etc/ssh/sshd_config.d/50-redhat.conf there should not include a line „PasswordAuthentication yes“ (as this is already the default and should not be repeated in order not to hinder other configurations).
-
-
5.5. Install fail2ban
The software monitors the log files for authentication errors. In case of multiple retries from the same IP address, it reconfigures the firewall on the fly to block the source IP This is to prevent brute force methods for cracking passwords and bots checking for weak passwords. However, a system administrator may also lock himself out, if if they happen to make a mistake. Therefore, you can exclude destinct IP addresses, e.g. the administrators desktop, from blocking.
-
Installation of the software and the required Postfix
[…]# dnf install fail2ban -
Create and fill configuration file
[…]# vi /etc/fail2ban/jail.local # Jail configuration additions for local installation # Adjust the default configuration's default values [DEFAULT] # Optional enter an trusted IP never to ban #ignoreip = www.xxx.yyy.zzz/32 bantime = 6600 backend = auto # The main configuration file defines all services but # deactivates them by default. We have to activate those neeeded [sshd] enabled = true -
Activate software
[…]# systemctl enable fail2ban --now -
Control in the log
[…]# tail -f /var/log/fail2ban.log-
Installation of the software and the required Postfix
[…]# dnf install fail2ban postfix -
Create and fill configuration file:
[…]# vi /etc/fail2ban/jail.local # Jail configuration additions for local installation # Adjust the default configuration's default values [DEFAULT] # Optional enter an trusted IP never to ban #ignoreip = www.xxx.yyy.zzz/32 bantime = 6600 backend = auto # The main configuration file defines all services but # deactivates them by default. We have to activate those neeeded [sshd] enabled = true -
Activate
[…]# systemctl enable postfix --now […]# systemctl enable fail2ban --now -
Control in the log
[…]# tail -f /var/log/fail2ban.log
-
5.6. Secure Cockpit access
-
The cockpit login should remain secured behind a firewall to prevent any brute force attempts from the outset.
[…]# firewall-cmd --permanent --remove-service=cockpit […]# firewall-cmd --reload -
To access Cockpit you may use a ssh tunnel, eg
ssh host.example.com -L 9090:host.example.com:9090
localhost:9090
or add Cockpit service temporarily on demanded
ssh host.example.com
firewall-cmd –add-service=cockpit
5.7. Complete storage configuration
During installation we installed and configured just the system area. Now we have to set up the user data area.
You can either use the CLI and issue some comands in the SSH terminal, or you may use Cockpit and its Web GUI.
- Using CLI
-
-
Create a partition completely filling the free disk space of sda
It uses automatically the complete space available and the next free partition number (partition 4, if you follow the steps here).
[…]# sed -e 's/\s*\([\+0-9a-zA-Z]*\).*/\1/' << FDISK_INPUT | fdisk /dev/sda n # add new partition # partition number, default 1st free # first sector, default 1st free # last sector, default last free t # define type # partition, default the new one 42 # type Linux RAID w # write partition table and exit FDISK_INPUT -
Repeat for drive sdb
(short form, without comments, retain the empty lines!)
[…]# fdisk /dev/sdb << FDISK_INPUT n t 42 w FDISK_INPUT -
Create a Raid drive
[…]# mdadm --create /dev/md/pv01 --level raid1 --raid-devices=2 /dev/sda4 /dev/sdb4 -
Prepare a physical volume (PV)
[…]# mdadm --create /dev/md/pv01 --level raid1 --raid-devices=2 /dev/sda4 /dev/sdb4Accept default metadata version not suitable as boot device.
-
Create a Volume Group (VG)
[…]# pvcreate  /dev/md/pv01
[…]# vgcreate usrvg /dev/md/pv01
[…]# vgdisplay
-
- Using Cockpit
-
-
Select Storage in Cockpit’s main menu and then your drive in the right column.
-
Select Create new partition and fill in the upcomming form accordingly.
-
n the box "Devices" select from the Menu "Create LVM2 volume group" and fill in the upcomming form accordingly.
-
5.8. Manage system updates
It is common sense among system administrators,that regular installation of bug fixes and closing of security vulnerabilities is essential, i.e. applying updates in a systremtatic way. An important step is to automate the process as much as it is reasonable.
Fedora includes a tool, dnf-automatic, which supports several modes of update automation: do not apply, notify admin, apply and notify admin, apply without notification. In particular, alternatives 2 and 3 are definitely worth considering. A general principle might be: Alternative 2 is the minimum choice for almost any system, alternative 3 is not at all suitable for critical systems that must not fail under any circumstances.
We recommend to install at least alternative 2:
[…]# dnf install dnf-automatic

[…]# vi /etc/dnf/automatic.conf
##emit_via = stdio
emit_via = email
##email_from = root@example.com
email_from = root@host.example.com
##

[…]# vi /etc/aliases
...
# Person who should get root's mail
#root:        marc
root:         real@address.for.root

[…]# newaliases
[…]# systemctl enable --now dnf-automatic-notifyonly.timer
If you want to automatically install, activate the corresponding timer instead.
[…]# systemctl enable --now dnf-automatic-install.timer6. Add virtualization support
In our exemplary planning for the server, we have chosen to use virtual machines for all publicly accessible services and a private virtual network for protected internal communication. This is to keep direct access to the host system itself to a minimum. This requires the addition of virtualization support to the installation.
On your rented server, the installation steps are basically the same as described in the Adding Virtualisation Support guide for Standard Server.
-
Create and mount storage space for libvirt
Libvirt stores its data including the virtual disk image files for the guest systems in /var/lib/libvirt. According to the installation concept, this data goes into the user data space, in the example here into the Volume Group (VG) usrvg. Its set up was part of the post-installation tasks. Therefore, before software installation create a logical volume, install a file system, and mount it at the appropriate position.
A comfortable way to do this is via Cockpit. But we are at CLI anyway so the most eficient way is to perform some commands.
[…]# lvcreate -L 500G -n libvirt usrvg […]# mkfs.xfs /dev/usrvg/libvirt […]# mkdir -p /var/lib/libvirt […]# vim /etc/fstab <APPEND> /dev/mapper/usrvg-libvirt /var/lib/libvirt xfs defaults 0 0 […]# mount -a […]# systemctl daemon-reload -
Install libvirt virtualisation software
[…]# dnf install qemu-kvm-core libvirt virt-install cockpit-machines guestfs-toolsPackage libguestfs-tools provides various useful tools to maintain virtual disks. Avoid to install the group @virtualisation onto a Fedora Server. It includes various graphical programs and libraries that are not usable on headless servers.
-
Check the SELinux labels
[…]# ls -alZ /var/lib/libvirtjust if needed:
[…]# /sbin/restorecon -R -vF /var/lib/libvirt -
Activate the internal network
By default, libvirt creates a bridge with an interface virbr0, the IP 192.168.122.1 and the internal name default. In addition, a separate firewall zone libvirt is set up. By default, the network is activated on demand, but we need a permanent internal network activated at boot time.
[…]# systemctl enable virtnetworkd.service --nowCheck fir correct IP and firewall zone
[…]# ip a
1: lo: <LOOPBACK,UP,LOWER_UP> mtu 65536 qdisc noqueue state UNKNOWN group default ...
    link/loopback 00:00:00:00:00:00 brd 00:00:00:00:00:00
    ...
2: enpXsY: <BROADCAST,MULTICAST,UP,LOWER_UP> mtu 1500 qdisc fq_codel state UP ...
    link/ether ...
    inet ...
    inet6 ...
    inet6 fe80::...
3: virbr0: <NO-CARRIER,BROADCAST,MULTICAST,UP> mtu 1500 qdisc noqueue state DOWN ...
    link/ether ...
    inet 192.168.122.1/24 brd 192.168.122.255 scope global virbr0
       valid_lft forever preferred_lft forever

[…]# firewall-cmd –get-active-zones
FedoraServer
  interfaces: enp3s0
libvirt
  interfaces: virbr0
7. Finally update system and install additional application software
Now that secure administrative access is in place, it’s time to update the system and install some useful software. Of course, 'useful software' varies depending on the use case or applications that will be run on Fedora Server. Anyway, a good choice might be vim. With vimdiff e.g. a comparison of updates of configuration files (*.rpmnew) is very comfortable and straightforward.
[…]# dnf install vim-default-editor  --allowerasing
[…]# dnf update
Add to the software list as needed.
Finally reboot the server.
8. Configure service infrastructure
-
Configuring libvirt DNS
By default, the internal network is configured with DHCP and without DNS. To enable communication of the VMS with each other and with the host, a DNS is advantageous, which enables addressing by name.
The <dns> tag activates DNS for the addresses assigned via DHCP. The host itself is entered statically. If you use additional static names, you have to add them manually in ~/libvirt/dnsmasq/. Don’t include a forwarder address for external addresses. It will break the VMs split-dns capability. Furthermore, the mtu can be adjusted at the same time. See: https://libvirt.org/formatnetwork.html.
[…]# virsh net-edit default
<network>
  <name>default</name>
  <uuid>aaaaaaaa-bbbb-cccc-dddd-eeeeeeeeeeee</uuid>
  <bridge name='virbr0' stp='on' delay='0'/>
  <mac address='52:54:00:xx:yy:zz'/>
  <forward mode='nat'/>
  <mtu size='8000'/>
  <domain name='example.lan' localOnly='yes'/>
  <dns forwardPlainNames='no'>
    <forwarder domain='example.lan' />
    <host ip='192.168.122.1'>
       <hostname>_HOST_</hostname>
       <hostname>_HOST.EXAMPLE.LAN_</hostname>
    </host>
  </dns>
  <ip address='192.168.122.1' netmask='255.255.255.0'>
    <dhcp>
      <range start='192.168.122.2' end='192.168.122.254'/>
    </dhcp>
  </ip>
</network>
Activate the modified configuration.
[…]# virsh net-destroy default
[…]# virsh net-start default
Check if the DNS resolution works.
[…]# nslookup _HOST_ 192.168.122.1 […]# dig @192.168.122.1 _HOST.EXAMPLE.COM_ -
Split DNS configuration
By default, Fedora uses systemd-resolved for system-wide DNS resolution. It determines the appropriate DNS server for a given domain name part and queries it (split DNS capability).
This works smoothly with VMs or containers that use standard network drivers.
The host system uses libvirt network drivers that systemd-resolved can’t properly cope with. Therefore, split DNS doesn’t work on the host. For the most part, this is not a problem because the host usually does not need to address any VMs. If it does, a workaround is required.
-
Finishing Cockpit-machines configuration
Open your browser, connect to the Cockpit instance, and get administrative privileges. In the overview (start) page select Virtual Machines in the left navigation column.
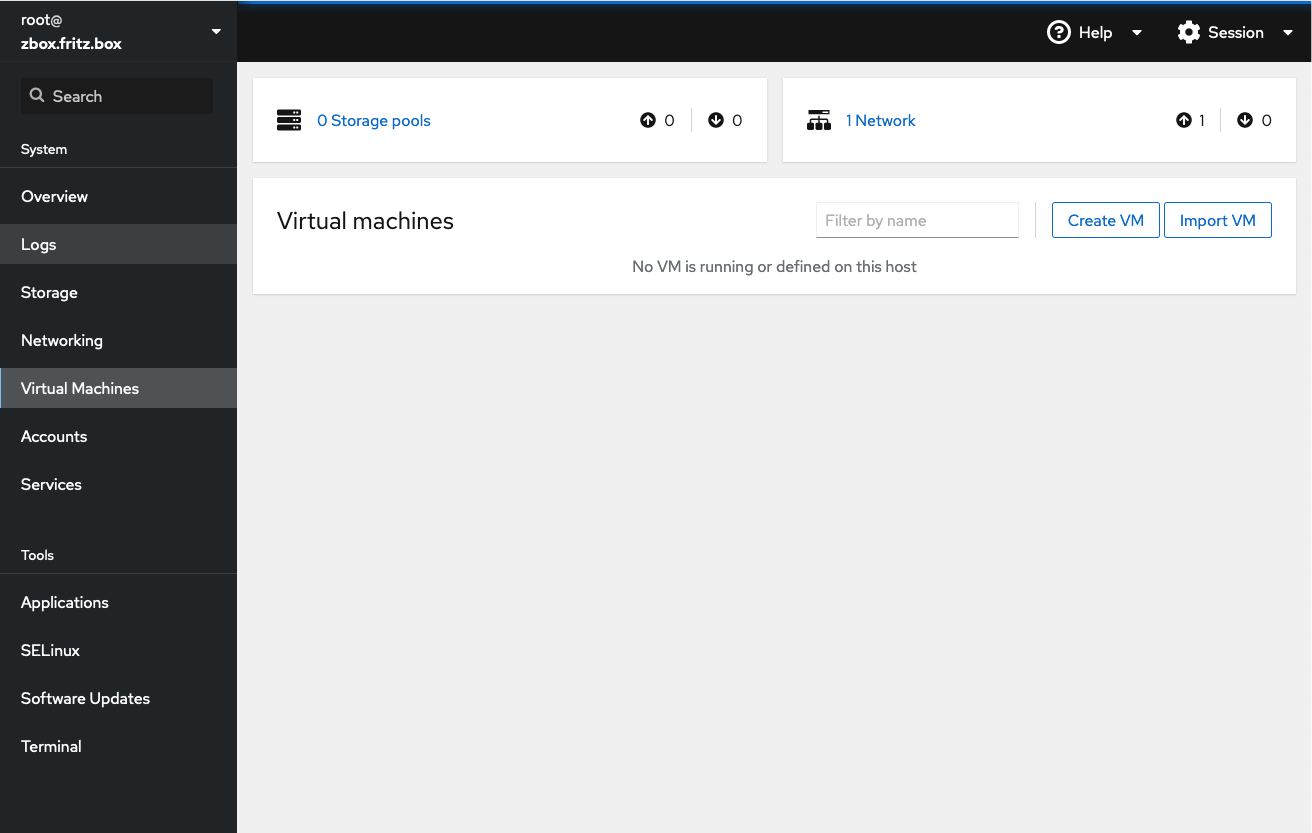
Above the empty list of virtual machines there is a box "storage pools". Libvirt uses pools to determine the location of typical files. The installer has already created the directories. Only the pools need to be defined here.
Typically you use one Pool for installation media, stored at /var/lib/libvirt/boot. "Installation media" would be a suitable descriptive pool name. Select 0 Storage pools in the box and then Create storage pool. A new form opens.
You are asked to select a connection type, "system" or "session". Select "system" to make it systemwide accessible. Next enter "Installation media" as the name, "Filesystem directory" as the type, and /var/lib/libvirt/boot as the target path.
In most cases, the (virtual) hard disk used for a virtual machine is a disk image file stored in /var/lib/libvirt/images. Define another pool named "Disk images" accordingly.
Activate both pools in the drop down menu of each pool.
-
Provisioning the Server VM image
-
If not already done, download the Fedora Server Edition virtual disk image into the Installation media storage pool and verify the image. If you choose another Fedora release, adjust the names accordingly.
[…]$ sudo -i
[…]# cd /var/lib/libvirt/boot
[…]# wget https://download.fedoraproject.org/pub/fedora/linux/releases/37/Server/x86_64/images/Fedora-Server-KVM-37-1.7.x86_64.qcow2
[…]# wget https://getfedora.org/static/checksums/37/images/Fedora-Server-37-1.7-x86_64-CHECKSUM
[…]# curl -O https://getfedora.org/static/fedora.gpg
[…]# gpgv --keyring ./fedora.gpg *-CHECKSUM
[…]# sh -c ' cd /var/lib/libvirt/boot/  &&  sha256sum --ignore-missing -c *-CHECKSUM '
Fedora-Server-KVM-37-20221002.n.0.x86_64.qcow2: OK
If you copy or move files directly from elsewhere, you should check the correct SELinux label and correct it if necessary.
[…]# ls -alZ /var/lib/libvirt/boot/* […]# /sbin/restorecon -R -vF /var/lib/libvirt/boot/* -
Adjust the image file to your needs. The maximum disk size of the server VM image file is 7GB, of which about 6GB in the root file system is free. This is not intended for productive operation, but as a starting point for customization. The minimal recommended size is about 20G. To save these adjustment steps for further instantiations, create a customized base image. Copy the disk image to an intermediate file and adjust the maximum disk size.
[…]# cd /var/lib/libvirt/boot
[…]# cp Fedora-Server-KVM-37-1.7.x86_64.qcow2  Fedora-Server-KVM-37-custom.qcow2
[…]# qemu-img info   /var/lib/libvirt/boot/Fedora-Server-KVM-37-custom.qcow2
[…]# qemu-img resize /var/lib/libvirt/boot/Fedora-Server-KVM-37-custom.qcow2 +30G
[…]# qemu-img info   /var/lib/libvirt/boot/Fedora-Server-KVM-37-custom.qcow2
The example above adds 30 GiB to the maximum image size. You can resize the virtual disk later, too. Therefore, there is no reason to plan too generously in terms of size now. Due to the qcow2 format resizing does not affect the current image file size. It is dynamically adjusted as needed up to the maximum specified.
If you intend to create multiple VMs with similar structure, it may be useful to customize the customised file in detail.
-
Done. The service infrastructure is ready for operation.
9. Setting up a brouter bridge for public network access
It is a peculiarity of the Hetzner infrastructure that all IP addresses assigned to a server are routed to its physical Ethernet interface, i.e. its MAC address. So we have to route the data packages.
-
Check the forwarding configuration
To be able to route data packages, forwarding has to be active.
[…]# cat /proc/sys/net/ipv4/ip_forward
[…]# cat /proc/sys/net/ipv6/conf/default/forwarding
Both cases must return a value of 1. The IPv4 part might already have forwarding active because of Libvirt basic configuration, but probably not IPv6. If necessary, activate forwarding temporarily.
[…]# echo 1 > /proc/sys/net/ipv4/ip_forward
[…]# echo 1 > /proc/sys/net/ipv6/conf/all/forwarding
For permanent setup, create the following file:
[…]# vim /etc/sysctl.d/70-enable-forwarding.conf # local customizations # # enable forwarding for dual stack net.ipv4.ip_forwarding=1 net.ipv6.conf.all.forwarding=1 -
Create the bridge
To clearly describe the function of the bridge, we choose a name analogous to the public Ethernet interface. With an interface enpXsY, the bridge would get the name vbrXsY. The IP addresses are the same as of the external interface, but different network prefix to trigger routing! IPv4 is a point-to-point network, so we use the corresponding subnet for the bridge. We configured the IPv6 with a previx of /128, so we use the full /64 for the bridge. Replace the placeholder by the actual IPs.
[…]# nmcli con add  con-name vbrXsY  ifname vbrXsY  type bridge  stp off \
     ipv4.method manual  ipv4.addresses 'xx.yy.zz.ww/27'  \
     ipv6.method manual  ipv6.addresses '2a01:xxx:yyy:zzzz::2/64' \
     ipv6.addr-gen-mode eui64

Connection 'vbrXsY' (...) successfully added.
Without a firewall zone specified, the bridge resides in the default firewall zone, just as the public interface. This is very important for correct firewall permissions!
-
Add IPv4 routing information
While iPv6 determines the routing itself, IPv4 explicitly requires a routing entry for each additional IPv4 address.
[…]# nmcli con mod vbrXsY +ipv4.routes "xx.yy.zz.uu/32" […]# nmcli con mod vbrXsY +ipv4.routes "xx.yy.zz.vv/32" […]# nmcli con mod vbrXsY +ipv4.routes "xx.yy.zz.ww/32" -
Finally activate the bridge
[…]# nmcli con up vbrXsY
[…]# systemctl restart  NetworkManager
10. Instantiate a Fedora Server virtual machine
You can either use Cockpit or CLI to instantiate a virtual machine. For sake of efficiency we use CLI here.
-
Copy the customized distribution file into the disk image pool and use virt-install to instantiate the new virtual machine
According to our planning, the VM has 2 network interfaces, either connected to a bridge. To facilitate routing, it is advantageous to consistently use the first interface for public access. Hence, the order of the network interfaces is significant.
[…]# cp /var/lib/libvirt/boot/Fedora-Server-KVM-37-custom.qcow2  \
        /var/lib/libvirt/images/{VM_NAME}.qcow2
[…]# virt-install  --name <VM_NAME> \
     --memory 4096  --cpu host --vcpus 2 --graphics none \
     --os-variant fedora37 \
     --import  \
     --disk /var/lib/libvirt/images/<VM_NAME>.qcow2,format=qcow2,bus=virtio \
     --network bridge=vbrXsY,model=virtio \
     --network bridge=virbr0,model=virtio
The parameters are quite descriptive and are to be adjusted accordingly.
A lot of messages then scroll across the screen. The public interface doesn’t provide DHCP and generates a NetworkManager error message (Failed to start NetworkMan…[0m - Network Manager Wait Online). You can safely ignore it for now.
It finally ends with a simple, text-based input mask for the first boot configuration.
Starting install... Running text console command: virsh --connect qemu:///system console <VM_NAME> Connected to domain '<VM_NAME>' Escape character is ^] (Ctrl + ]) ... [ OK ] Reached target User and Group Name Lookups. Starting User Login Management... [ OK ] Started NTP client/server. [ 21.523663] NET: Registered PF_QIPCRTR protocol family ================================================================================ ================================================================================ 1) [x] Language settings 2) [x] Time settings (English (United States)) (Etc/UTC timezone) 3) [x] Network configuration 4) [x] Root password (Connected: enp2s0, enp1s0) (Root account is disabled) 5) [ ] User creation (No user will be created) Please make a selection from the above ['c' to continue, 'q' to quit, 'r' to refresh]: -
Complete the first boot configuration
The clear majority of the input options are already preset with values that correspond exactly to a default installation using the Anaconda Fedora Server Edition installation program. The ROOT account is locked, as is common security practice.
The selection of a menu item to be edited is made via the digit in front of it. Somewhat unusual in these days and age. The process is unfortunately a bit idiosyncratic and cumbersome. Therefore it is best, just to configure the bare minimum - i.e. the administrative user account - and later use a more comfortable terminal for the further configjuration items.
-
Create the administrative user
A "5" navigates to the item "User creation" and a "1" then to the creation of a new user.
================================================================================
================================================================================

User creation

1) [x] Create user
2) Full name
3) User name
4) [x] Use password
5) Password
6) [x] Administrator
7) Groups
   wheel

Please make a selection from the above ['c' to continue, 'h' to help, 'q' to
quit, 'r' to refresh]:
The "[x]" in front of Create user indicates that the user creation process is activ. Accordingly, password authentication is enabled for the new user as well as administrator privileges.
Fill in the missing required information. In any case ensure to keep the adminstrator privileges (group "wheel".
With all user options set, the 'c' returns back to the overview screen.
-
Optionally adjust timezone
Additionally, all non-British users may grab the opportunity to adjust the time zone using option 2 now. This item is easily to configure here, too.
-
Another "c" continues with the execution of the entire configuration process. The operation takes some time and then ends in a login prompt.
...
...
[  OK  ] Finished Initial Setup configuration program.
[  OK  ] Reached target Preparation for Logins.
[  OK  ] Started Getty on tty1.
[  OK  ] Started Serial Getty on ttyS0.
[  OK  ] Reached target Login Prompts.
[  OK  ] Reached target Multi-User System.
         Starting Record Runlevel Change in UTMP...
[  OK  ] Finished Record Runlevel Change in UTMP.

Fedora Linux 37 (Server Edition)
Kernel 6.0.7-301.fc37.x86_64 on an x86_64 (ttyS0)

fedora login:
In the first lines you may get 2 SELinux messages alike "systemd-gpt-auto-generator[xxxx]: Failed to dissect: Permission denied". You can savely ignore those messages.
The virtual server is up and running now, and ready for log in.
-
-
Login into the virtual maschine
We are using the libvirt terminal now. It is still quite simple. So we sill concentrate on the most urgent configuration items to enable external connectivity and provide a ssh connection from our desktop. For the following steps you need administrative privileges.
[…]# sudo -i-
Optionally: Adjust locale and non-US keyboard layout
Users of a non-US keyborad layout probably want to customize the keyboard layout first of all. This facilitates any subsequent operation. First, check the current locale configuration
[…]# localectl
System Locale: LANG=en_US.UTF-8
    VC Keymap: us
   X11 Layout: us
List available keyboard mappings filtered by your short county code part (German de- in this example).
[…]# localectl list-keymaps  | grep de-
de-T3
de-deadacute
de-deadgraveacute
de-deadtilde
de-mac
de-mac_nodeadkeys
de-neo
de-nodeadkeys
...
Determine applicable key mapping and apply it
[…]# localectl set-keymap de-nodeadkeysThe setting is immediately activ.
-
Set hostname
A correct hostname is specifically important for DHCP of the internal network to work properly. You need a correct static hostname.
[…]# hostnamectl […]# hostnamectl set-hostname <YourFQDN> -
Complete the network configuration
List the available interfaces
[…]# nmcli con
NAME                UUID                                  TYPE      DEVICE
Wired connection 2  ea5710a3-52be-346a-b3b7-9b6e22be70bc  ethernet  enp2s0
Wired connection 1  9036bb5a-46f3-3830-bd4a-0f9d5b049c94  ethernet  --
The interfaces are a named somewhat an awkward way. Let’s fix that to make administration easier and more comfortable. Don’t forget to adjust the naming to your specific installation!
[…]# nmcli con mod 'Wired connection 1' connection.id enp1s0
[…]# nmcli con mod 'Wired connection 2' connection.id enp2s0
[…]# nmcli con
NAME    UUID                                  TYPE      DEVICE
enp2s0  ea5710a3-52be-346a-b3b7-9b6e22be70bc  ethernet  enp2s0
enp1s0  9036bb5a-46f3-3830-bd4a-0f9d5b049c94  ethernet  --
Configure the external interface. Because of the limitations of the terminal we accomplish that in several steps.
[…]# nmcli con mod enp1s0  ipv4.method manual \
     ipv4.address "xxx.xxx.xxx.xxx/32" \
     ipv4.gateway "xxx.xxx.xxx.zzz"
[…]# nmcli con mod enp1s0  ipv4.dns "xxx.xxx.xxx.uuu,xxx.xxx.xxx.vvv,xxx.xxx.xxx.www"
[…]# nmcli con mod enp1s0  ipv6.method manual \
     ipv6.addresses "xxxx:xxxx:xxxx:xxxx::yyyy/64"  \
     ipv6.gateway "xxxx:xxxx:xxxx:xxxx::zz"
[…]# nmcli con mod enp1s0  ipv6.dns "xxxx.xxxx.xxxx.xxxx::vvv"  \
[…]# nmcli con mod enp1s0  connection.zone "FedoraServer"
[…]# nmcli con up enp1s0
[…]# systemctl  restart  NetworkManager
Check the availibility of the interfaces and external connectivity.
[…]# ip a
[…]# ping getfedora.org
[…]# resolvectl query <your_internal_host_name>
[…]# resolvectl query <your_external_host_name>
[…]# resolvectl query getfedora.org
Everything should work as expected. A ping to IPv6 addresses should work, but not (yet) to an IPv4 address. The latter is because the order of the routing entries is incorrect due to the initially missing configuration of the external interface (check with `ip r`, the internal interface is first).
The internal interface enp2s0 allocates a local IPv6 address. Since internally connectivity uses IPv4 only, IPv6 should be completely disabled.
[…]# nmcli con mod enp2s0 ipv6.method "disabled"
[…]# nmcli con up enp2s0
[…]# ip a
-
-
Update the system and reboot
[…]# dnf install vim-default-editor --allowerasing […]# dnf update […]# reboot -
Final check out
The reboot provides you again a libvirt console terminal. Login again an check baic functionality.
-
All IP addresses should be available
[…]# ip a -
The order of route entries should fit
[…]# ip r -
A ping to an IPv4 and IPv6 address should work
[…]# ping <SOME_IPV4_ADDRESS> […]# ping <SOME_IPV6_ADDRESS> […]# ping getfedora.org -
DNS server should be available as expected
[…]# resolvectl dns Global: Link 2 (enp1s0): 213.133.98.98 213.133.99.99 213.133.100.100 2a01:4f8:0:1::add:1010 2a01:4f8:0:1::add:9999 2a01:4f8:0:1::add:9898 Link 3 (enp2s0): 192.168.122.1 -
Split domain resolution should work
[…]# resolvectl domain Global: Link 2 (enp1s0): Link 3 (enp2s0): example.lan -
From your desktop try a ssh connection to the virtual machine
[…]$ ssh <YOUR_USER>@<FQDN>
-
-
Completed
If everything works as expected, logout and close the terminal.
[…]$ exit

<ctrl>+]
Domain creation completed.
You are back on your host system.
[…]$ virsh list
Id   Name        State
------------------------
 1   <YOUR_VM>   running
Probably you want the virtual machine o start automatically when the host system boots.
[…]$ virsh autostart <YOUR_VM>
Domain '<YOUR_VM>' marked as autostarted
Want to help? Learn how to contribute to Fedora Docs ›